According to a study, 91% of marketers believe lead generation to be their prime goal when building marketing campaigns. This is quite obvious, as generating leads is the bread and butter for the marketing team for any B2B business.
When you want to excel in your marketing, getting your prospects to visit your website and make them stay on it for a long time is essential. When new opportunities come to your website, the last thing you’d want is for them to leave without being your leads. That’s where the Salesforce Web-to-Lead form is helpful.
Turning your website visitors into leads doesn’t always have to be complicated. It can be as simple as getting them to fill out a form on your website with their information and the services they need.
You can use a well-designed form to ask demographics and specifics of the visitors and what products and services they’re interested in. That’s something web-to-lead makes possible.
As a Salesforce consulting agency, we’ve helped many clients construct web-to-lead forms to collect details from their website visitors.
We’ve assisted them in automatically saving information from forms on their website to new lead records in their Salesforce instance. This enabled them to route users to other pages on the website, send quick and automatic email follow-ups, and begin the customer journey.
What is Web-To-Lead in Salesforce?
Web-to-Lead is a process in Salesforce to use a website form to collect the visitor’s information and store it as a new lead in Salesforce. The feature enables you to create a lead record in Salesforce, extracting data from a form that a visitor has filled to your website.
Companies highly use the feature of Web-to-Lead in Salesforce to generate customer feedback on their products and services.
A web-to-lead form is essential to enable sales and marketing automation for companies. It helps to capture data submitted by website visitors who could be your potential leads and then save it as a Lead record in Salesforce. The information could include anything like lead contact information and their preferred products.
Using Web-to-Lead in Salesforce can help you to:
Generate leads directly from your official business website
Boom the sales by achieving more prospects
Easily integrate forms with a website
Improve lead qualification without any hard-core programming
How to Setup Web-to-Lead Forms in Salesforce
Step 1: Use your credential to login into Salesforce.
Step 2: Go to Setup.
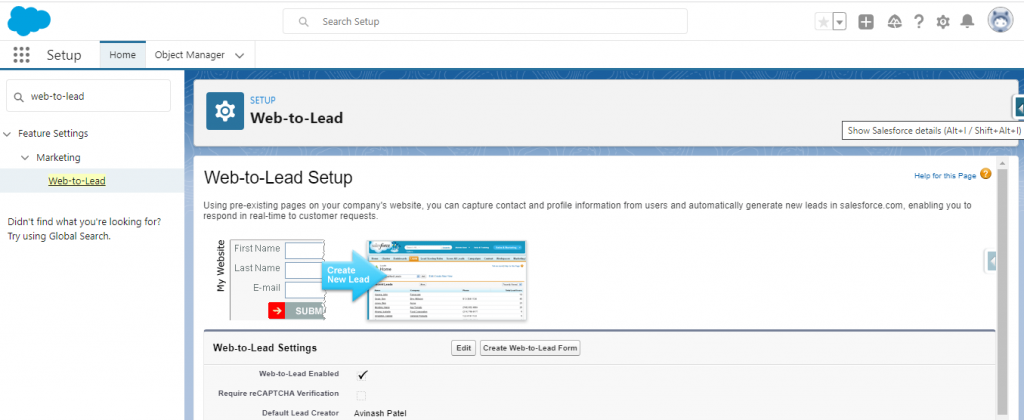
Then select Customize -> Leads -> Web-to-Lead.
You will see that the checkbox Web-to-Lead Enabled is selected by default. Also, Salesforce will show the System Administrator as the default lead creator.
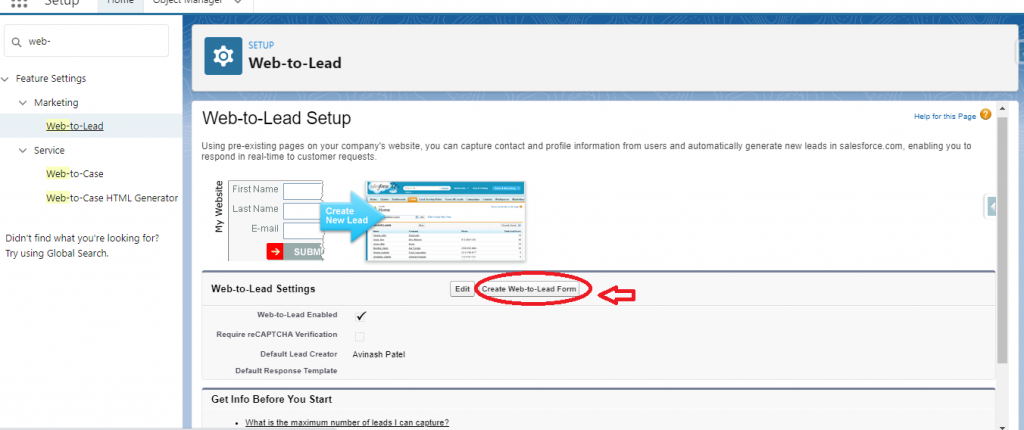
Step 3: Click Create Web-to-Lead Form.
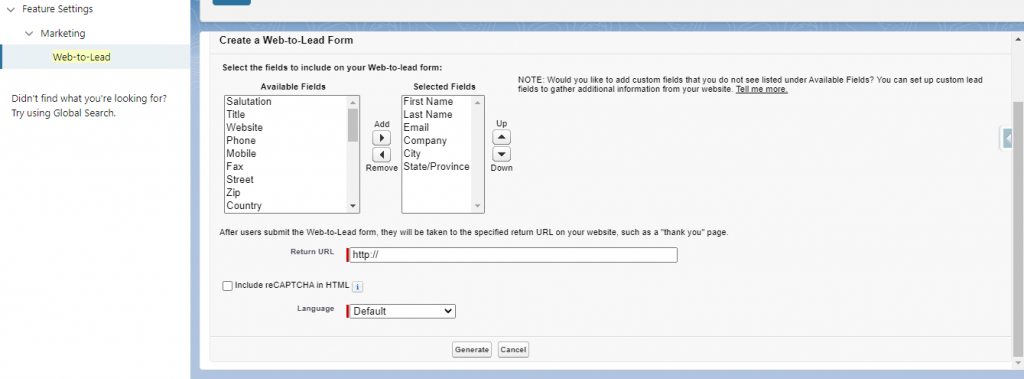
Step 4: You’ll be navigated to the following screen after clicking the button.
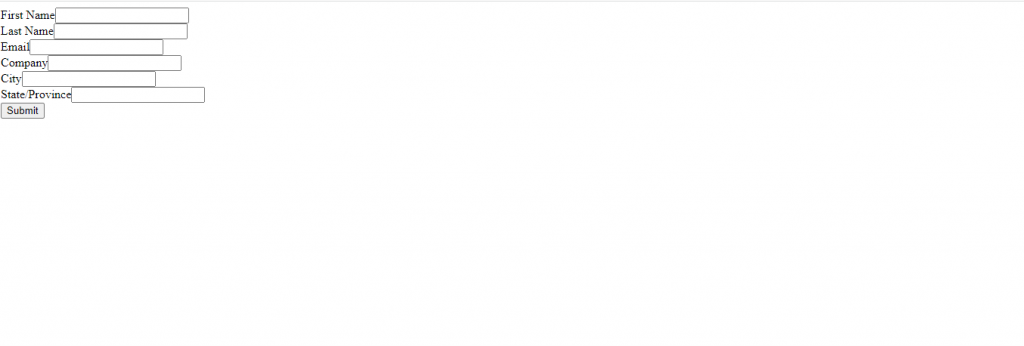
Select the fields you want in your form from the Available Fields section. You’ll have fields selected in the Selected Fields section. Enter your preferred URL in the Return URL. Then click Generate.
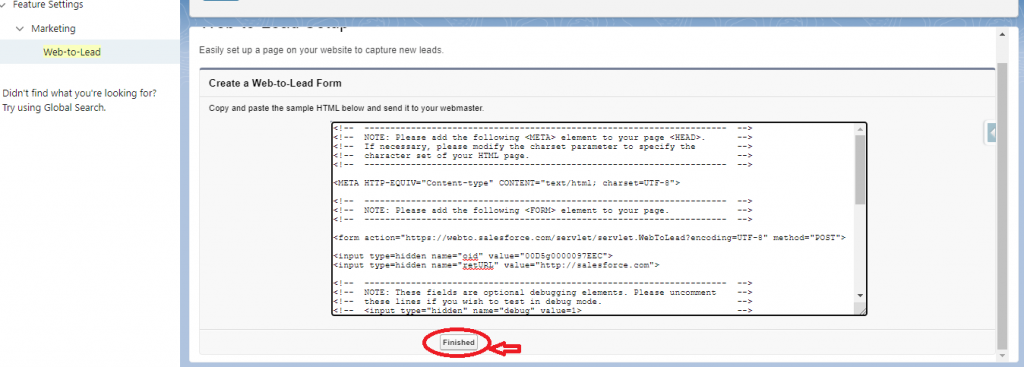
Step 5: You’ll get an HTML code generated that can be changed as per your requirements. You can add this code to your website after changing it accordingly. Click Finished once done.
Step 6: You’ll see you have constructed the form with the fields you selected. Complete the form and check if a new lead has been created.
Capturing lead information from your website was never this easy.
Web-to-Lead forms allow you to save lead information and create new records effortlessly. It saves your team from all the trouble they had to go through to track and record lead data manually.
The PDF attached will help you to create your web-to-lead form easily. But if you still need assistance and want to know more about the feature, our Salesforce consultants will provide the guidance you seek.
Have a Message For Us?
Please fillup the form and send your message.
Interact with the external data using External Objects in Salesforce
Imagine your company just implemented Salesforce and uses data from multiple external sources to power the CRM. In such a case, employees often switch from Salesforce to other external sources, due to which their productivity takes a severe hit.
This can be a story for many Salesforce users who face a horrid time switching between Salesforce and external applications. So, the question here is how you can resolve this problem.
That’s exactly where External Objects and Salesforce Connect shine.
Using external objects through Salesforce Connect helps users access external data from within Salesforce, thus saving them from switching between multiple applications. As a Salesforce consulting firm, we’ve helped many clients save work hours by accessing their external data within Salesforce.
Let’s better understand how exactly you can access your external applications within Salesforce, starting with learning about Salesforce Connect and external objects.
What is Salesforce Connect?
Salesforce Connect is a highly reliable and robust App Cloud integration service. It enables Salesforce users to seamlessly access and manage data stored in external data sources without leaving the Salesforce native environment.
Salesforce Connect helps you to fetch data from on-premise applications and cloud-based sources. It enables all users of a Salesforce org to connect with an external data source through one login account or create a separate login account for each user.
What are External Objects?
External data sources have respective external objects used by the Lightning platform for interacting with the external data.
External objects are like the custom objects in Salesforce. But the difference here is that the external object record data is stored outside your Org. The data could be stored in external systems like SAP, Oracle, Heroku Postgres, etc.
Each external object is related to an external data source definition in your Salesforce org. An external data source specifies how Salesforce users access an external system. It is important to note that each Org can have up to 100 external objects.
Ways to Link Salesforce Connect with External Applications
We’ve mentioned here different data adapters that you can use to establish a connection between an external data source and Salesforce Connect:
1.
Open Data Protocol (OData): OData is a highly used REST-based protocol for integrating data. You can link data sources to Salesforce Connect, exposed by OData 2.0 or 4.0 producers.
2.
Custom-developed adapters: Salesforce users can also consider easy-to-use adapters in Apex to link APIs that are not in the OData format. These are tailor-made adapters that can easily connect with any web API. You can use these adapters to link to thousands of publicly available APIs.
3.
Salesforce Connector: This adapter is ideal for using multiple Salesforce instances. Salesforce Connector is very user-friendly and can connect external applications without coding anything.
Relationships between data objects in the external source and Salesforce
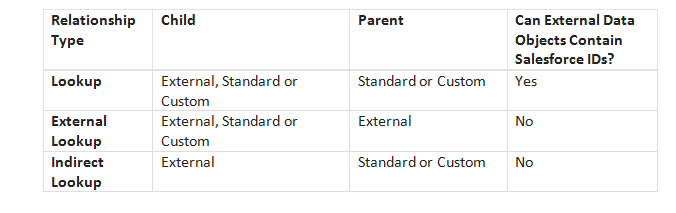
There are three types of relationships that you can establish between the external data objects and their counterparts in your Salesforce data system:
Lookup
External Lookup
Internal Lookup
The possible parent-child data object relationships are shown in the image below.
Steps to Set Up Salesforce Connect
Now, let’s dive into the steps you should follow to set up Salesforce Connect to access external data.
Step 1: Configure an External Data Source
Configure external data sources to connect Salesforce to external applications or systems. These could include off-the-shelf solutions like Jitterbit, SAP, or SharePoint or integration with the help of an OData library such as odata4j.
1.
Login to your Salesforce Developer Edition.
2.
Click Setup.
3.
Click Develop > External Data Sources.
4.
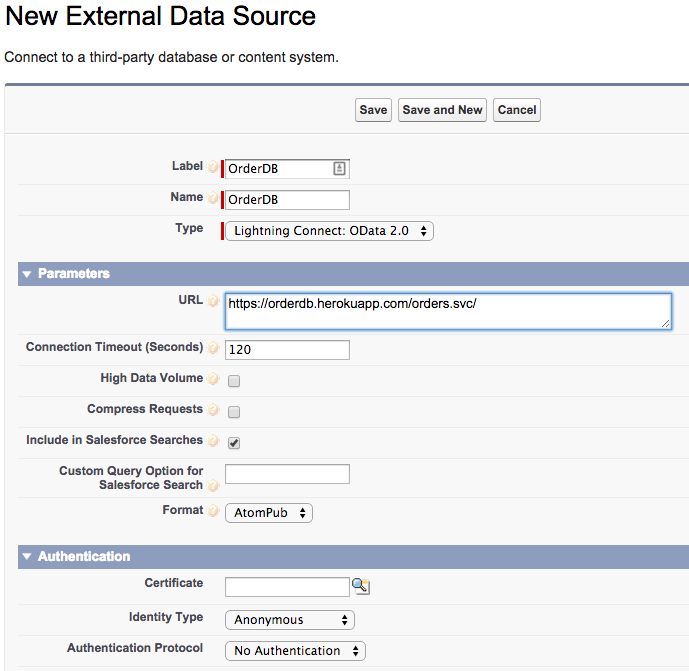
Click New External Data Source.
5.
Enter OrderDB as the Label. As you click the label field, the Name field should automatically default to OrderDB.
Leave the remaining with their respective default values. Click Save.
With this, you’ve configured an external data source. Now you can select the tables you wish to integrate into your Salesforce org.
Step 2: Create External Objects
1.
Click Develop > External Data Sources and then click the OrderDB external data source if you are not already on the OrderDB external data source page after you’ve completed the previous steps.
2.
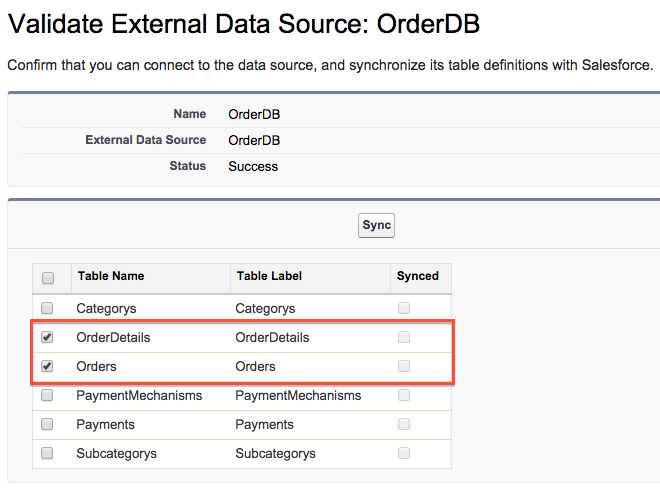
Click Validate and Sync
3.
You must select both checkboxes for Order and OrderDetails.
4.
Click Sync.
Step 3: Inspect the External Object Configuration
1.
Click Develop > External Data Sources and then click the OrderDB external data source if you are not already on the OrderDB external data source page from the previous step.
2.
Scroll down to find External Objects. Click Orders.
3.
Lightning Connect created this external object from the metadata of the order database. Lightning Connect created a set of custom fields just as you would create for a custom object.
The key differences between an external object and a custom object are:
The API names of an external object have the suffix __x instead of __c.
External objects have different standard fields
External objects have a reference to their external data source along with a table within that source.
Step 4: Access Order Records by Creating Custom Tabs
1.
Click Setup.
2.
Click Create > Tabs.
3.
Click New, which is next to Custom Object Tabs.
4.
Select Orders as the Object.
5.
Click the selector next to Tab Style. It allows you to choose whichever style you like.
6.
Click Next.
7.
Click Next. This will allow you to accept the default tab visibility settings.
8.
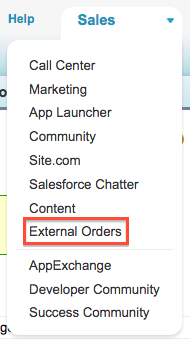
Click the checkbox Include Tab to deselect all the apps.
9.
Select the checkbox External Orders.
10.
Click Save.
Step 5: View the External Order Data
1.
If the app menu is not showing External Orders already, click the app menu and select it.
2.
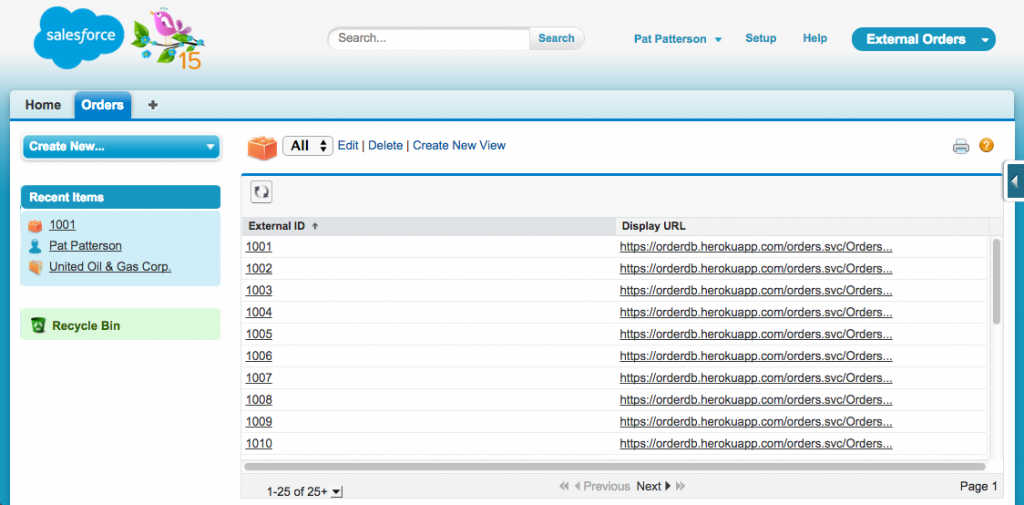
Click Orders.
3.
Click Go.
Lightning Connect retrieved order IDs from the sample order database for the first 25 order records.
4.
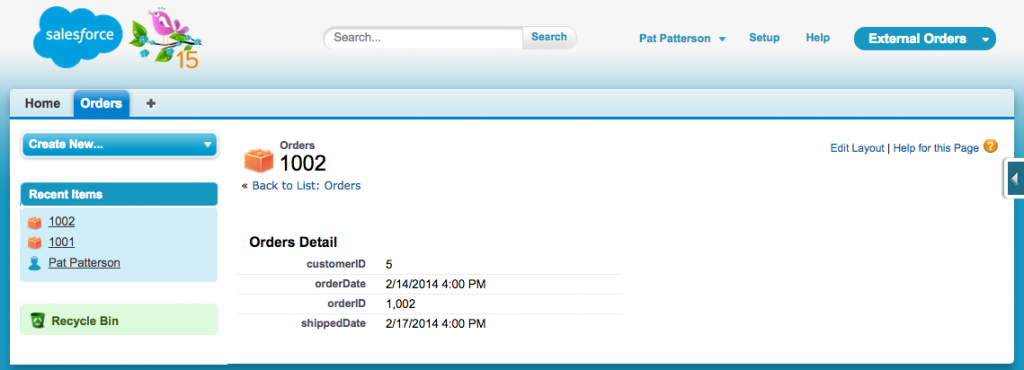
Click any one of the order external ID values.
Lightning Connect retrieved the fields for selected orders
Creating external objects and working with Salesforce Connect is a very convenient way for users to access and handle data from external sources in the native Salesforce environment without any hassle.
The steps in the given PDF will help to supercharge your user’s productivity by eliminating the struggle of switching between multiple systems. But if you need any help with that, our Salesforce consultants will always be there to assist you.
Setting up meetings is inescapable at most companies. But if you have to keep adding those meetings to different platforms manually, the time wasted adds up, which can get frustrating. Don’t add those meetings to other platforms; you might lose track of those meetings. That can cause even more trouble. Damned if you do, damned if you don’t.
Salesforce can save you here, allowing you to synchronize your Google Calendars with your Salesforce org, eliminating manual work or errors of double entries. This also helps to remove the friction involved in booking meetings and appointments.
Being the trusted Salesforce integration partners, we’ve worked on this synchronization between our clients’ Calendar and Salesforce using Salesforce’s Einstein Activity Capture feature. You can synchronize your Google and Outlook Calendars and Salesforce with Einstein Activity Capture by following a few steps.
But before we dive into these steps, let’s understand how integrating your Calendar with Salesforce could help you.
Why Should You Consider Integrating Google Calendar with Salesforce
Being able to manage your Google Calendar from within Salesforce can bring a lot of benefits for you. We’ve listed a few of these benefits of syncing your calendar with Salesforce.
1. Automatic scheduling
After setting meeting dates, times, and agendas, you can send individual emails for notifications and reminders. You must arrange the settings once, and the integrated tool automatically sends emails. Meanwhile, Salesforce will collect all the critical data from responses from the teams.
2. Enhanced productivity
It is undoubtedly more time-consuming to work with two separate applications just to complete a single purpose. Integrating Salesforce and your Calendar makes it easy to communicate with your teams easily from one platform, thus saving time and effort that could contribute to other essential tasks.
3. Better coordination between team members
You can create events of any size and bring on board everyone involved by integrating Google Calendar with Salesforce. It certainly makes it easier for team members to coordinate effectively.
4. Access to real-time notifications
It is crucial to respond to notifications as they come as you want to get all the critical updates and details about some running projects. This integration helps you view these notifications in real-time so you can take action on it as soon as possible.
5. Better, informed decision-making
Having both platforms integrated give you better visibility of your sales team. It allows seamless interaction. So the entire team gets involved in the decision-making process, which helps you make better-informed decisions and enhance performance.
We’ve learned about the benefits you’ll uncover by integrating your Google Calendar with Salesforce. Let’s now take a step ahead to integrate it using Einstein Activity Capture.
What is Einstein Activity Capture?
Einstein Activity Capture is an effective tool for boosting productivity, used to keep data up to date between Salesforce and your email and calendar applications. To do so, Einstein Activity Capture focuses on three data types—contacts, emails, and events. This tool can make it effortless to synchronize your Calendar with Salesforce.
We will take you through the no-code integration solution to connect your Google Calendar with Salesforce in just a few steps.
How to Configure Einstein Activity Capture to Sync Google Calendar with Salesforce
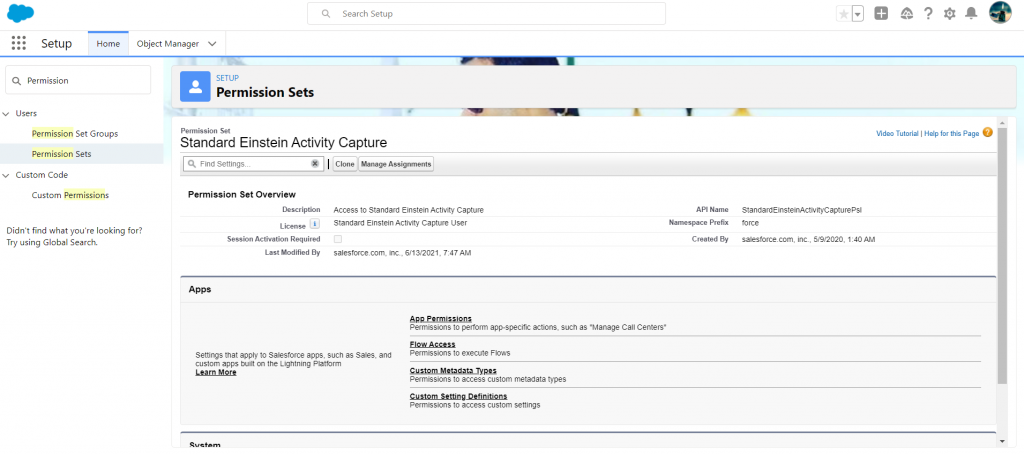
Step 1: Enable permission set for Einstein Activity Capture
1. Go to setup and look for Permission Set.
2. Click Standard Einstein Activity Capture from the list. Select Manage User.
Then click Add Assignments.
3. Now you have to choose users to whom you want to assign the permission.
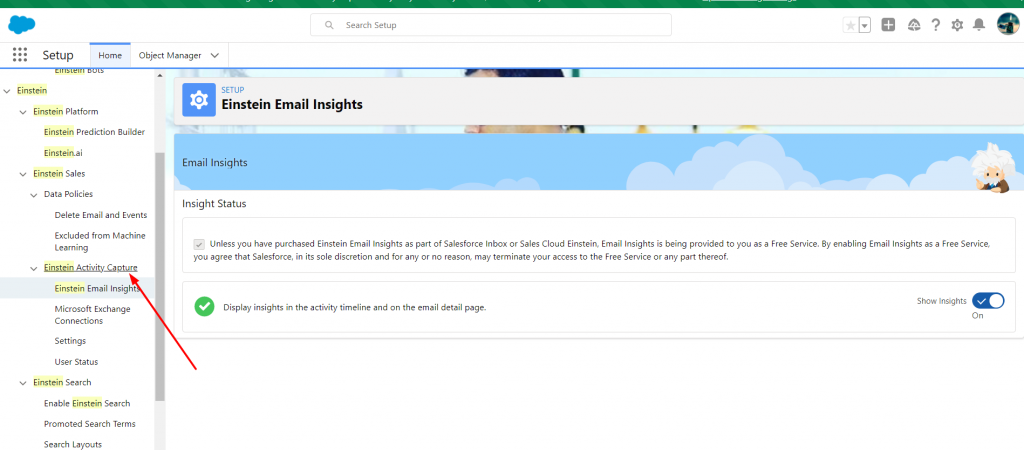
Step 2: Manage Settings to Configure Einstein Activity Capture
1. Go to Setup and search Einstein Activity Capture.
2. Now select Settings and click Configuration.
3. Click Edit and add respective users from Profile Assignments.
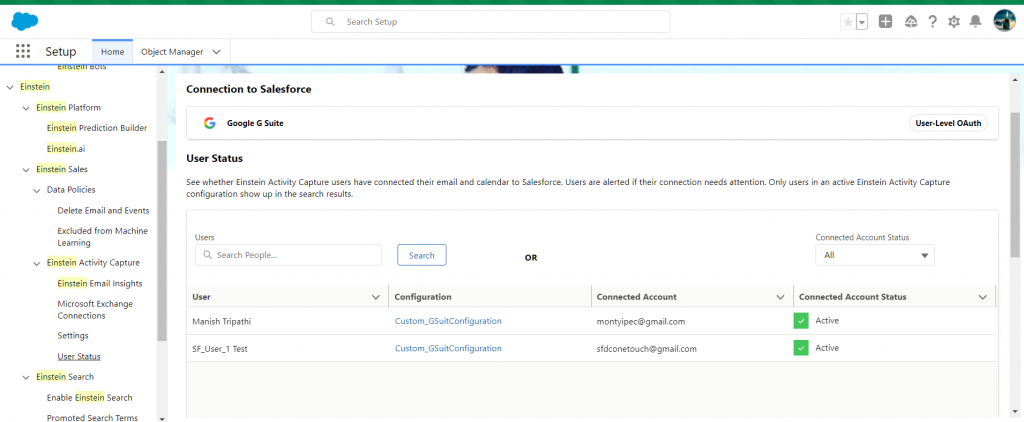
Now, under the User Status, you’ll find users you’ve added.
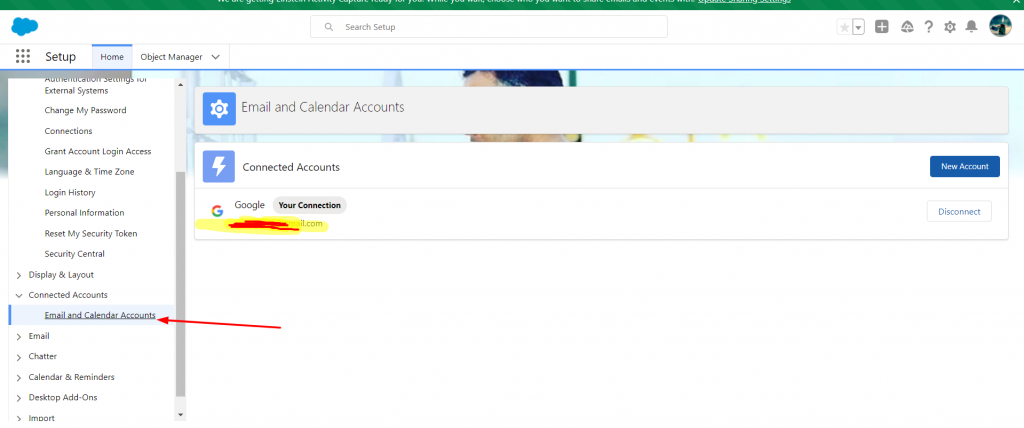
Step 3: Connect your G-Suite Account
1. Now you have to add your G-Suite account.
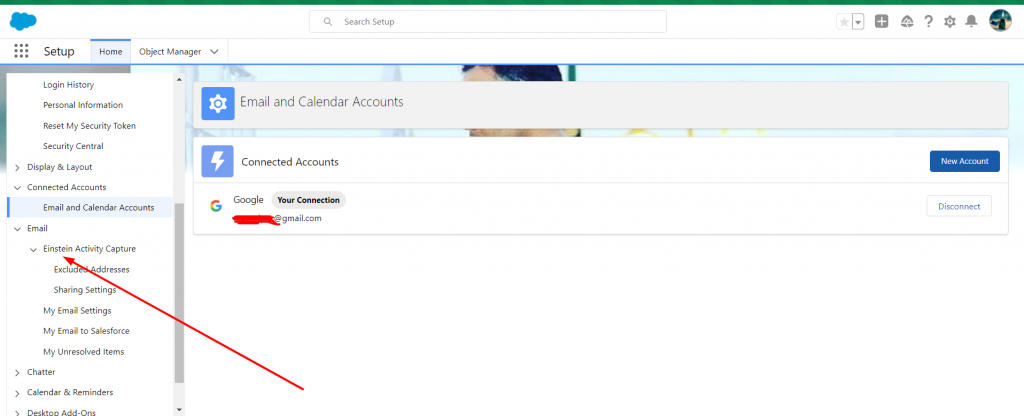
2. Go to the Profile Setting. Under that, you’ll select Einstein Activity Capture.
3. Now you must select Sharing Setting and choose Connect Account.
You can select Connected Accounts if you want to connect more than one account or disconnect any.
You can select from the multiple sharing settings- Only Me, Everyone, or My Groups.
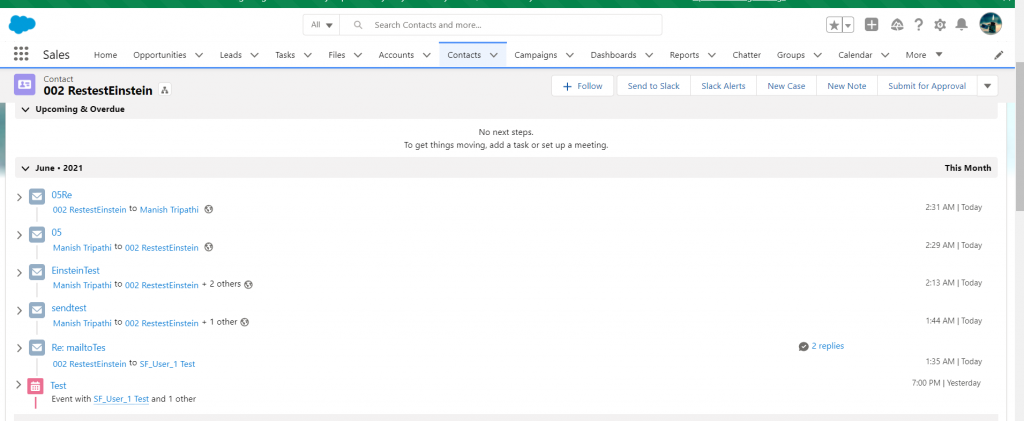
You can test the configuration by adding events on your Gmail calendar that will be visible in your Salesforce org.
There you have it, the no-code solution for synchronizing your Google Calendar with Salesforce.
Scheduling meetings and running sales campaigns is a daily task for many companies. Integrating Salesforce with Google Calendar makes it easier for them to arrange and manage meetings and events without the need to keep switching them.
Salesforce and Heroku are two of the most potent platforms actively used by businesses.
Connecting Salesforce to Heroku allows you to get Salesforce CRM data to update the Sales Cloud automatically. The integration saves time and ensures your sales teams always have the needed data from the application in Salesforce, thus improving their productivity.
Users have so far discovered many ways to move data in and out of Salesforce, but it’s not worth it if the process is challenging, time-consuming, and expensive. That’s where bringing Salesforce and Heroku together works.
We have helped many companies leverage Heroku Connect to achieve this with minimal effort.
In this article, we’ll brief you about Heroku and Heroku Connect and its features and how its bi-directional synchronization with Salesforce could be helpful.
Also, we’ll guide you through the steps to integrate Salesforce with Heroku using Heroku Connect. This will help you access your data stored in Heroku Postgres Database within Salesforce.
What is Heroku?
Heroku is a Platform as a Service widely relied upon among developers, allowing hassle-free application deployment, scaling, and management.
The platform supports multiple programming languages such as Python, Java, PHP, Ruby, Node.js, Scala, and Clojure. Heroku uses virtual containers called Dynos to run applications.
Charges of Heroku are based on computing resources like RAM and virtual machines allocated for its use. It helps developers achieve swift application development, making it a convenient platform for use.
Being PaaS, Heroku provides a fully managed service, can automatically scale up / down servers, and takes care of the infrastructure. Heroku can be easily integrated with your Salesforce platform using Heroku Connect.
What is Heroku Connect?
Heroku Connect is an add-on for Heroku that helps users to sync selected Salesforce data with a Heroku Postgres database.
In essence, Heroku Connect is a data integration feature built strictly for Salesforce. Heroku Connect allows users to access a Postgres database called ‘Heroku Postgres’ for storing data.
Heroku Connect replicates the data stored in Salesforce, thus reflecting the changes made in Postgres into Salesforce. Similarly, all changes made in Salesforce get reflected in Postgres. This kind of bi-directional synchronization is the main advantage of using Heroku Connect.
The platform can be advantageous for time-sensitive use cases, helping developers improve customer experience in the app using the data in Salesforce. One of the best use cases is with apps that need to pull data directly from Salesforce and are required to stay updated frequently.
How Heroku Connect Works
For Heroku Connect to work, you must create a user-specified subset of the objects and fields from a Salesforce deployment into corresponding tables in a Postgres database. This mapping is done declaratively using a point-and-click UI. An initial read of Salesforce data populates it.
Some of the Heroku Connect features are:
Access Salesforce data via SQL: Heroku Connect allows you to use SQL’s full power for all your data management and development tasks.
Performance and scalability: Heroku Connect allows Postgres to act as an API cache as all data is stored in the database. It thus helps to quickly respond to read requests without requiring calls back to Salesforce.
Optimized Force.com API interactions: Heroku Connect uses many best practices to interact with the Force.com API. Heroku Connect automatically picks the most efficient API strategy based on the system’s state at any time and how much data is required to be changed or moved.
Set it and forget it: Once a user configures the Salesforce data they want to synchronize into Postgres, the Heroku Connect service will run without additional administration, programming, or scheduling.
Integrating Salesforce with Heroku using Heroku Connect
Heroku Connect is highly used to conduct Heroku Salesforce Integration efficiently. You can develop applications to share your data with Salesforce with Heroku Connect.
It also helps to collaborate data in your Heroku Postgres Database with accounts, contacts, etc., in the Salesforce Database.
Let’s move further with steps to implement the Heroku Salesforce Integration:
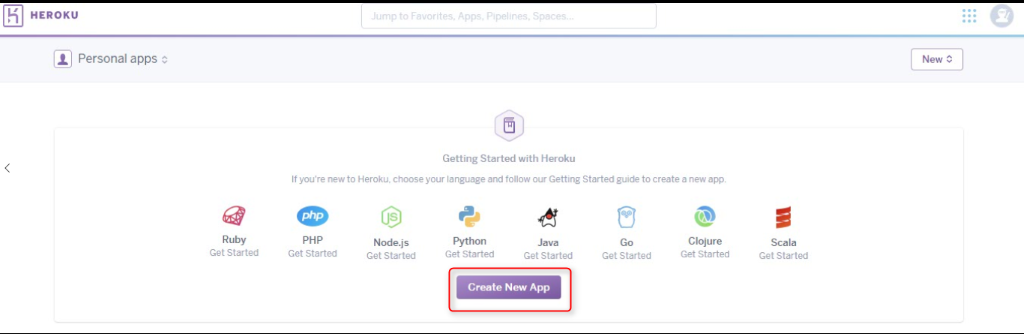
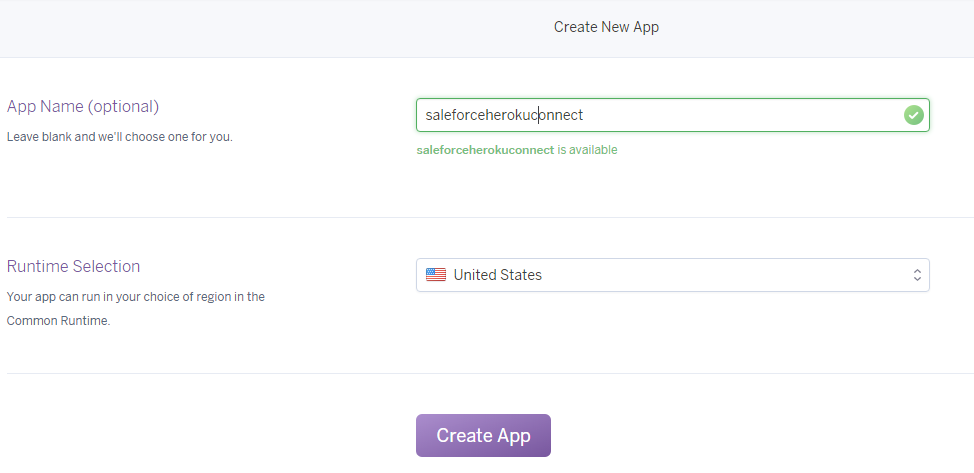
Step 1: Create a new Heroku application
Start with signing in to your Heroku account.
Navigate to the Heroku app creation page to find and click Create New App. You have to set a suitable name and region for your application. Then click Create App.
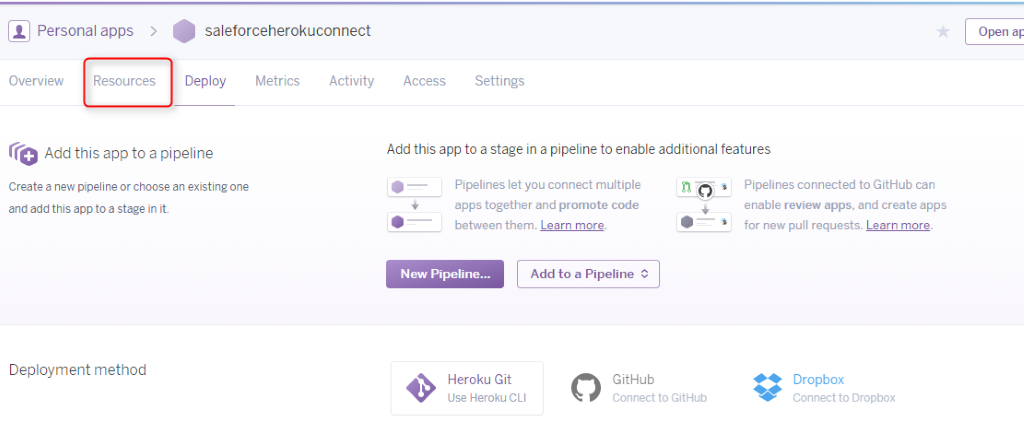
Step 2: Implement the Add-ons for Heroku
After creating a new application, you’ll be navigated back to the Heroku Dashboard.
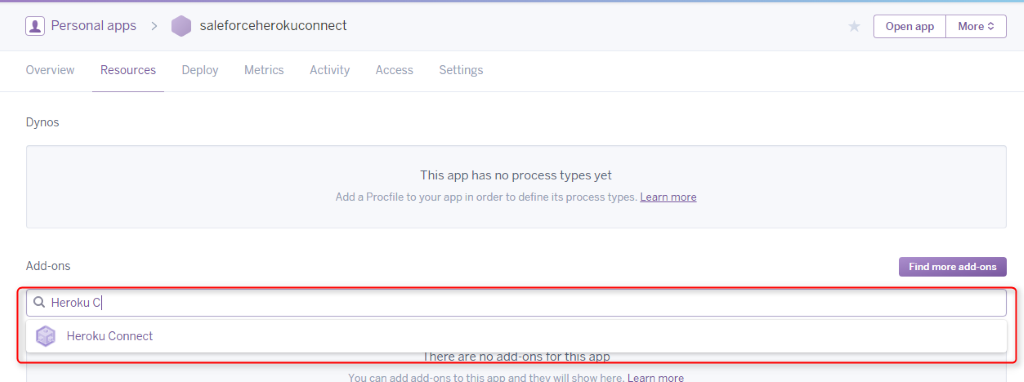
Now you have to navigate to the top menu and select Resources.
In the Add-ons search box, look for Heroku Connect. Then select provision to add Heroku Connect to your application.
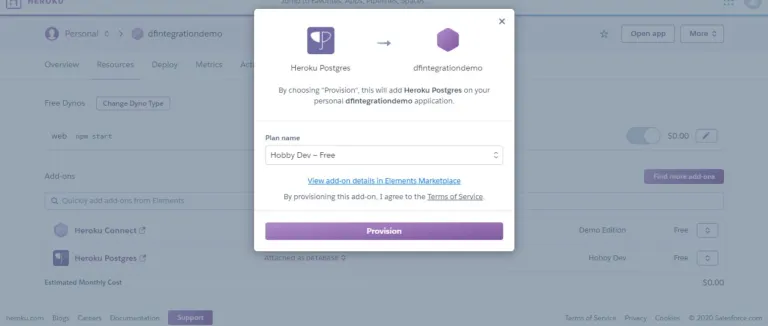
You must repeat the same process for another add-on, “Heroku Postgres.” Then use the plan “Hobby Dev Free” for provisioning it.
With this step, you can add both Heroku Connect and Heroku Postgres Database to your newly created application.
Step 3: Follow and Perform the Heroku Connect Salesforce Process
Work on initiating the Heroku Salesforce Integration process as the required add-ons are available in your application.
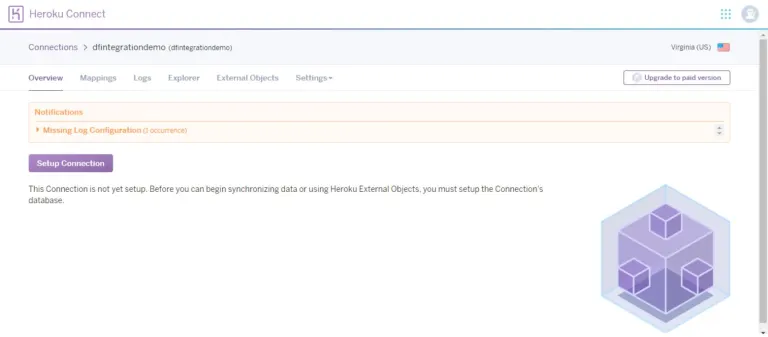
Click Heroku Connect Resource, and you’ll reach a new page. Click Setup Connection to set up your Heroku Salesforce connection.
Decide a relevant name for your schema. Click “Next” to continue with the Salesforce connect Heroku process.
Then you have to go to “Environment” and select production from its dropdown menu.
Select your API Version and click “Authorize,” as shown in the image below. Log in using credentials. This will begin your Heroku Salesforce integration.
Step 4: Create Mapping
Now your Heroku Salesforce Integration is in place. This enables you to map the desired Salesforce object with Heroku.
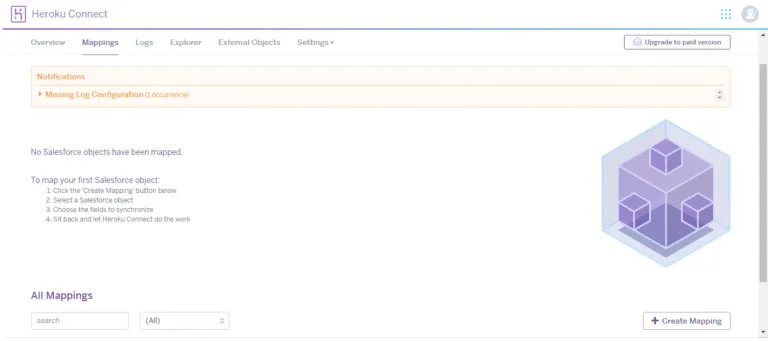
Log into your Heroku application. Go to “Resources.” Open Heroku Connect add-ons and select “Create Mapping. “
Select the object you want to map, and pick the required fields to synchronize with your Heroku application.
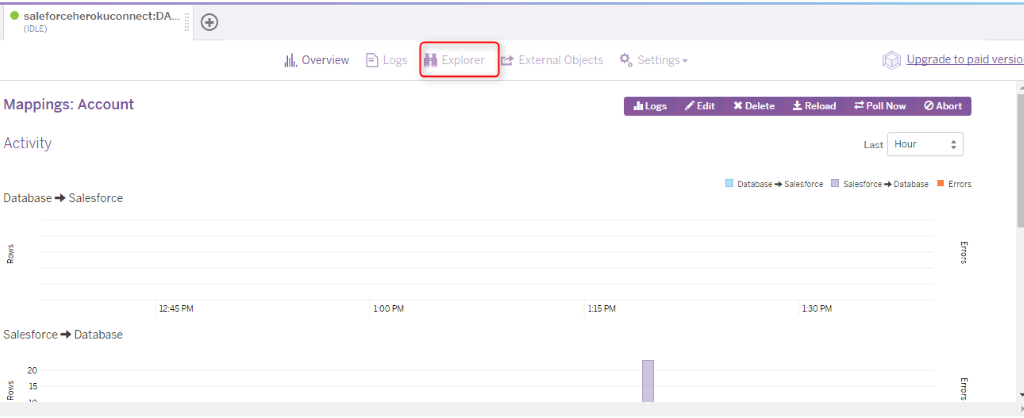
Once you’ve done it all, data from the Salesforce object will automatically synchronize with the Heroku application. You can also monitor the Salesforce data with the “Explorer” option at the top menu on the Heroku dashboard.
From data replication to data proxies, many reasons will persuade you to integrate Heroku with Salesforce, and using Heroku Connect is the best way to do so.
The given PDF will guide you through the steps to integrate Salesforce and Heroku using Heroku Connect, but if you need any help, get in touch with our certified Salesforce experts for the best assistance.
Have a Message For Us?
Please fillup the form and send your message.
Get your Linkedin integrated with your Salesforce to track all conversations
Almost every business has its presence on LinkedIn to expand its reach and connect with prospects, with a focus on getting better leads and brand awareness.
But are you sure you’re using LinkedIn to its full potential?
Being the company that’s using Salesforce for better customer relationships management, have you ever considered connecting it with LinkedIn to bring in potential customers?
LinkedIn can be a big help for you to tap the right prospects, bring leads, and close the deals quickly when combined with Salesforce. Let’s discuss Salesforce and LinkedIn integration in detail.
Salesforce and LinkedIn Integration
LinkedIn needs no introduction. It’s the largest professional online networking platform that has an active base of 722+ million users.
This platform is designed with the mindset to help people build and strengthen professional relationships and brush up their skills as per the market standards. No wonder, LinkedIn has deep-rooted its identity, but integrating it with Salesforce can add a lot more to its power.
The combined potential of LinkedIn and Salesforce has brought a new and noteworthy revolution to the business world.
The integration provides the sales teams of companies an opportunity to harness the power of LinkedIn Sales Navigator and Salesforce, easily targeting customers with suitable services and products.
Salesforce LinkedIn Integration will allow you to:
Discover customers who would be interested in your product and services
Learn about your customers with information available on their social profiles
Enable personalized outreach to connect and engage with customers
Help sales reps track down the detailed sales activities
What is a LinkedIn Sales Navigator?
LinkedIn Sales Navigator is a popular and innovative sales tool used by companies to make virtual selling easy. Sales reps are using it to look for the right customers or partners to make trusted, strong, and long-term relationships.
With the help of Sales Navigator, users can witness a seamless data flow between the platforms, thus letting the sales team work on a centralized platform. This saves them the time they had been spending switching the platforms to fulfill different tasks.
Let’s look into some excellent LinkedIn Sales Navigator features that can bring value to businesses:
Lead Recommendations: Quickly find the right people and provide customized suggestions to your targeted accounts.
Advanced Lead and Company Search: Boost your search experience to find the right customers and partners.
Notes and Tags: Take notes and easily sync them with your CRM.
CRM Integration: Save your lead and contact information automatically to CRM, logging the sales navigator activity with just one click.
Who viewed your profile: Discover people who have viewed your profile in the last 90 days.
In-mail messages: Tap 500 million LinkedIn members easily without having to connect them.
Team Link: Connect with your prospects using the combined network of your organization.
Obtaining LinkedIn Information in Salesforce
Integrating LinkedIn and Salesforce using LinkedIn Sales Navigator allows you to access a lot of LinkedIn data within Salesforce.
ILet’s check out what LinkedIn information you can obtain within Salesforce post-integration.
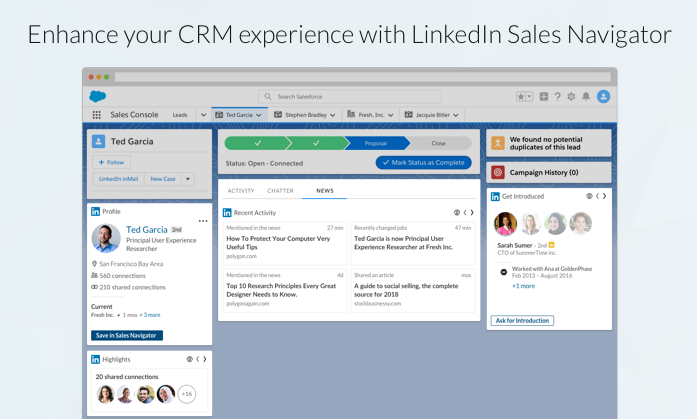
1. Search and View LinkedIn Accounts in Salesforce
Integrating LinkedIn with Salesforce using Sales Navigator allows users to search for LinkedIn contacts within Sales Navigator. They can then match the results to have the contact information stored on LinkedIn.
All you need is to create an Account and Contact in Salesforce with the same name you’re going to use to search in Sales Navigator.
Once contact is created, users can enter the name and search for it in Sales Navigator for matching the results. After doing so, users can view all the related contact information and posts on the home of Sales Navigator.
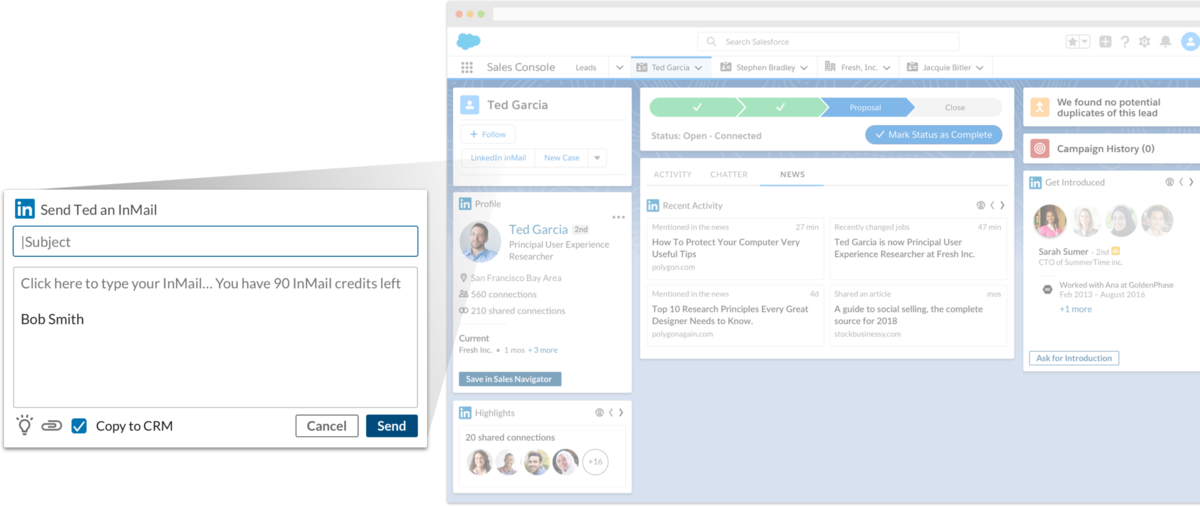
2. Sending LinkedIn InMails from Salesforce
The integration enables users to send LinkedIn InMails to their LinkedIn contacts from within Salesforce only. Click LinkedIn Inmail after you open the respective contact on Salesforce to whom you want to share the LinkedIn InMail.
Type the subject and message you need to send and select the checkbox Copy to CRM so the message can be synced with your Salesforce. Click Send.
Moreover, data acquired from snapshots can also help you to readily spot inefficiencies that exist within the sales process. As an example, you can filter reports on the basis of geographic location to determine high-yield regions versus low-performing regions.
3. Access Auto-Generated List of Salesforce Contacts
Sales Navigator enables users to find the list of their Salesforce lead and account contacts in a single view.
Click Lists on Sales Navigator and discover Lead lists. The list is in synchronization with your Salesforce org and thus will obtain all your Salesforce contacts into Sales Navigator.
How to Set Up the Salesforce and LinkedIn Sales Navigator Integration
When you combine the LinkedIn Sales Navigator with your Salesforce Account, it allows you to explore LinkedIn Accounts, Accounts, Opportunities, and a lot more in a single view.
Moreover, you’ll be able to access multiple LinkedIn features directly through your Salesforce account.
You can set up the LinkedIn Sales Navigator Salesforce Integration with the help of the following steps:
Step 1: Search for the LinkedIn Sales Navigator Tool
Sign in to your Salesforce account.
Locate the Quick Find search box on the homepage and type LinkedIn Sales Navigator.
Step 2: Initiate the Salesforce and LinkedIn Sales Navigator Integration
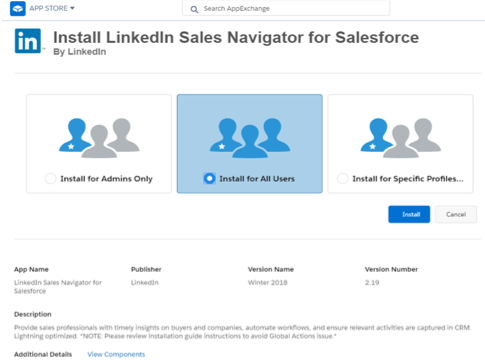
Initiate the LinkedIn Sales Navigator Salesforce Integration by going to the LinkedIn Sales Navigator AppExchange Package tab. Now click the Install button.
You’ll see a pop-up window on your screen. Click on the option Get it Now in that window.
Note: You might be asked to log into the AppExchange using your account credentials. This can be needed for the verification of your account for the LinkedIn Navigator Salesforce Integration.
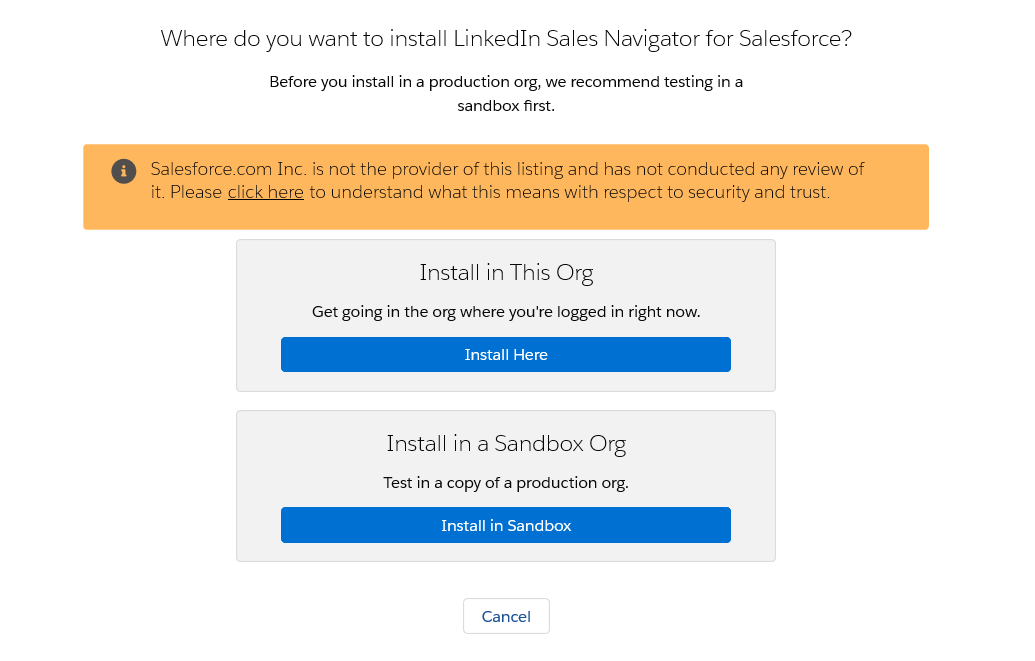
You will be given two installation options. Select the Install in This org option. Click Install Here.
Once you have reviewed and agreed to the terms and conditions for installation, click Confirm and Install.
Step 3: Set the User Access Limit
Now you have to choose from the following 3 options to determine the limit of users that can use the integration.
Select the Install for Admin Only option if you want to provide access to users with the admin account only.
Select the Install for All Users option if you want to grant access to all users.
Choose the Install for Specific Profiles options if you want to constraint the access to limited users only.
Once you’ve selected the desired option, click Install.
Step 4: Complete and Configure the Installation
If your screen says Installation Complete, it means your LinkedIn Sales Navigator Salesforce Integration process is completed.
However, if your screen mentions Processing, have to wait for an email notification saying that the installation is complete. You can configure the tool according to your preferences once the installation is over.
That’s it! The LinkedIn Sales Navigator Salesforce Integration is completed successfully.
The LinkedIn-Salesforce integration using Sales Navigator enables you to have complete visibility and easy access to LinkedIn feeds, contacts, and posts.
The integration thus helps Salesforce users to save an entire week’s work that they had been spending switching screens for sending InMails to prospects.
Salesforce integrations have enabled a great deal of ease to simplify data management, giving users a single view of all contacts and information. Connect with a team of Salesforce Consultation experts to know the relevant integrations that could scale up and extend your CRM capabilities and enhance your productivity.
Have a Message For Us?
Please fillup the form and send your message.
Make your life Simple and track your Team's Activity with 360 Telephony
Reaching out to customers through emails, social media, and other digital platforms is all good; but what would be the one way you’ll surely be able to take your brand to them?
It’s their mobile devices, something they always keep along and thus giving you a doorway to reach your customers. And, the best way to do so is through calling.
Our 360 SMS app is surely known as a reliable platform for sending out bulk messages and running powerful drip campaigns, but that’s not all.
Our app even supports the CTI features that we call 360 Telephony, made especially for salespeople. After all, what could be better for a sales agent than an integrated, centralized phone system that enables productive dialing and routing!
Features of 360 Telephony
Let’s have a look at some of the unique and advanced features of 360 Telephony that make it worth using for each business.
1. Auto-dialing for bulk calling
Dialing back-to-back is the biggest challenge while bulk calling; and sales reps cannot afford to waste that much amount of time.
With the auto-dial functionality feature of 360 Telephony, pre-decided numbers get dialed or skipped automatically from a list, thus cutting back on the dialing effort of your team.
2. Pop-ups with caller information
Lack of any details on the caller and your past interactions with them can adversely affect the customer service. Also, it might get frustrating for the caller to keep repeating the same thing to different representatives.
360 CTI helps to resolve this issue by generating a pop-up during an incoming call with the caller’s information and other details right on the representative’s screen.
3. Call forwarding
360 CTI allows you to forward calls to up to 9 numbers, thus decreasing the possibility of missing an incoming call.
4. Easy IVR setup
360 Telephony allows you to set up IVR in both male and female voices easily within a few minutes.
This feature enables you to add messages for auto-responders to read over IVR. And the best part, you don’t need to have the technical knowledge to access this text-to-speech functionality and configure IVR.
5. Call Routing and Conferencing
Too many calls to get a resolution can be irritating for a caller.
They might end up losing faith in your brand or eliminate the intention to make a purchase. But with 360 CTI, any resolution can be achieved over a single call.
The app supports advanced call transferring and conferencing capabilities to forward calls to the relevant subject matter expert or add the concerned person over an ongoing call, thus helping you to achieve first call resolution.
6.Set availability status
In case of unusually high call volumes, there are always chances of missing out on potential opportunities. That might lead to important callers waiting longer on hold which might frustrate them.
With 360 CTI, your agents can select their availability status as Online, Away, and Offline to confirm their availability for calls. Even during automatic call routing, calls will only be routed to agents marked online.
7. Call termination and autoresponse
The CTI capability of the app allows you to play auto-read or pre-recorded messages when a call is going to be terminated due to exceeding the number of trials or session length, busy queues, or unavailable staff.
How using 360 Telephony can help you
A sales team is always growth hungry.
So, any app or feature that could reduce their manual work and speed up efficiency and scale prospecting is highly valuable for the reps.
That’s what makes 360 Telephony a catch for your sales team.
Here’s how the app can help your sales reps:
1. Improve productivity and customer experience
360 CTI allows you to close more deals in less time with Click to Dial and Screen Popups for incoming calls. It even supports Advanced Call Routing, so you don’t have to miss a call ever. Also, your reps can capture in-call notes which can be saved directly in the customer’s Salesforce record.
2. Meet your sales quota each time
The CTI features of the app allow you to access tools like Power Dialer, IVR, and Prioritized Dialing that helps to increase customer engagement and close more sales.
With features like recordings & call monitoring, you can start coaching your sales team.
Along with this, you can always track which marketing campaigns drive revenue to give them more attention and work on improving the rest.
3. Faster results with zero setups & maintenance cost
It’s a fully configurable Salesforce CTI app that’s simple to use, and easy to install.
Being a native Salesforce CTI Application, it does not require any APIs or integration to run. Thus, it saves you from any hidden cost or add-on feature pricing.
Wrapping Up
Adopting a multichannel to sales and prospecting yields better results by reaching out to customers with a mix of calls and text messaging to stay-top-of-mind and scale communication. You’ll also qualify callers much faster and avoid more uninterested prospects and window-shoppers.
Just one app and you can improve your sales performance and productivity.
When you move to a well-htought out and automated platform ( like 360 Telephony) you never miss out on any customer again. And again, there’s a lot more that the 360 SMS app has got to offer you.
You can always talk to our certified team to learn more about the app.
Prepare to be pleasantly surprised.
Have a Message For Us?
Please fillup the form and send your message.
Integrate Salesforce to any 3rd Party Application with Zapier Magic
According to a 2019 Slack survey, 76% of workers are now using more apps than they tend to used five years ago. While in broad strokes, this can be considered positive for today’s businesses, inefficient app usage can have a negative impact on productivity.
Nearly 70% of responders said they spend at least 30 minutes a day — or over 130 hours each year — switching between multiple applications.
But what if you can connect all your apps and automate your mission-critical workflows to be more productive? In this issue, we’ll show you how to link all your third-party business tools with your Salesforce using Zapier integration.
problems in data capture.
What Is Zapier and How Does It Work?
Before getting into details, let’s first understand what Zapier is.
Zapier is a popular integration and automation platform that allows users to connect to more than 3,000 applications together.
It’s proven to be a great help for companies to easily share or receive information from separate apps and build customized workflows. These workflows automatically perform a sequence of tasks.
In Zapier, workflows are called “zaps” and are composed of two main parts:
Trigger –
the event that starts a zap and prompts action in a connected application
Actions –
events that happen in another app when a certain trigger occurs in the first app
Why Use Zapier for Salesforce Integration
Now, let’s take a closer look at the advantages that make using Zapier worthwhile.
Zapier automations save you an enormous amount of time. You no more have to spend time on manual app integrations, mappings, and testing.
The app can help you save a lot on the development cost, as Zapier provides you with no-code integration. You don’t have to fret about hiring developers on a retainer just for an integration.
Your Salesforce cloud data becomes a reliable, single source of truth which eliminates any chances of human error during data transfer.
Your marketing team would be able to generate leads from your social networks like Facebook and LinkedIn by syncing them to your Salesforce account.
You can easily set up custom notifications that you want to receive on specific zaps. This will allow you to stay in the loop and never miss an opportunity to reach your target audience from different apps.
You can work on building a rapport with your customers by setting up calendar events, like meetings and AMAs, on online platforms.
Integrating Salesforce with third-party applications using Zapier is easy and has been demonstrated as shown below.
How to Set Up Salesforce Integration with Third-Party Apps Using Zapier
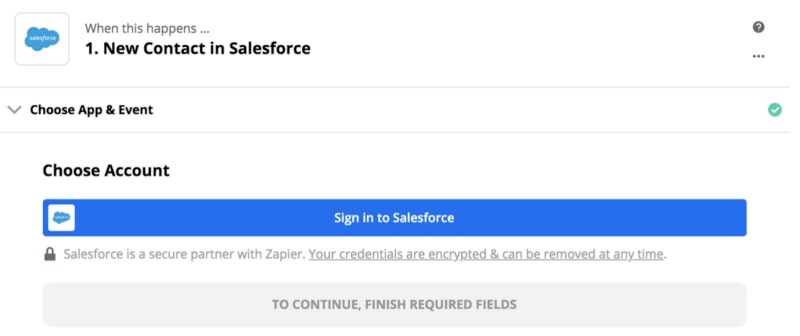
Step 1: Start with signing in to your Salesforce account, so that you can create a zap and start your integration process.
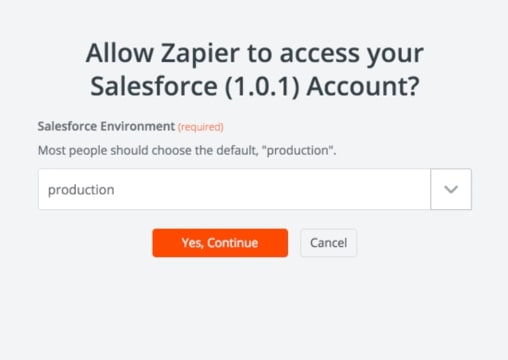
Step 2: Then select your Salesforce Environment. It could be either 'Sandbox' or 'Production.'
Make sure with your Salesforce administrator that you can log in with the suitable sandbox environment.
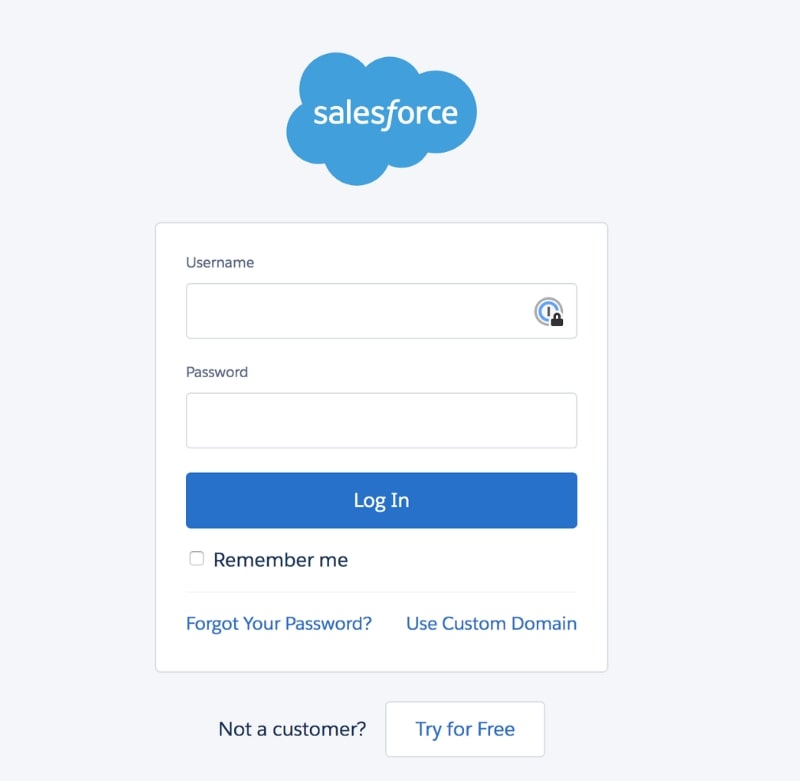
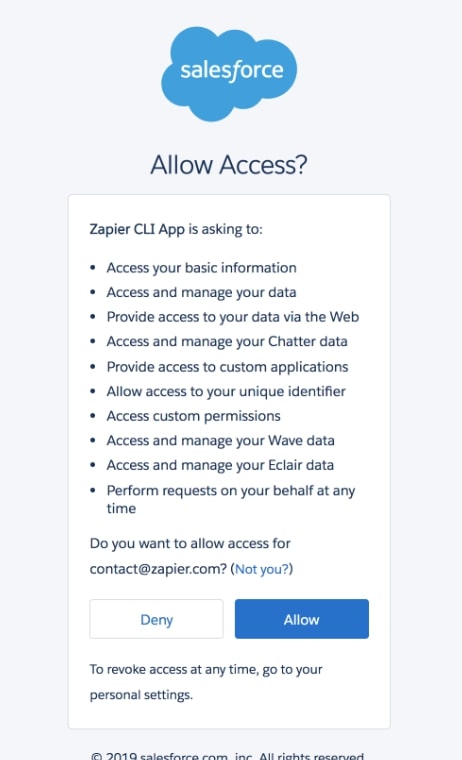
Step 3: You will then be automatically redirected to your Salesforce account if you are logged in. If not then you have to enter your credentials.
To perform the zap integration, grant the permissions by clicking on ‘Allow.’
Step 4: Finally, you will be connected to your zap integration setup.
With this, you will begin your integration process of Salesforce using Zaps.
Examples of a few popular Salesforce Integrations with Third-Party Apps using Zapier
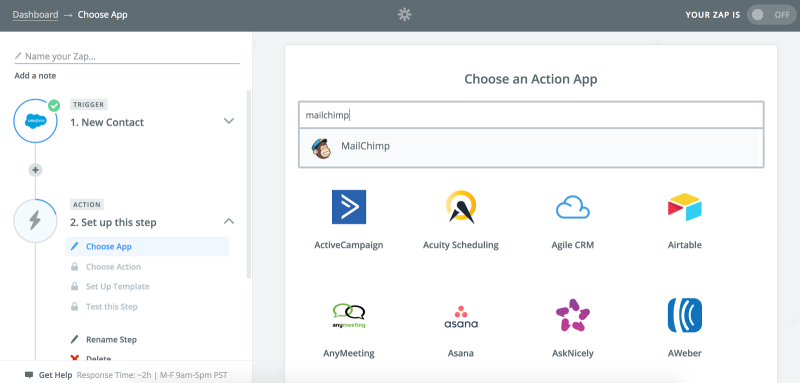
1. MailChimp
As an email marketing platform, Mailchimp is widely popular among email marketers and is used to launch and manage email marketing campaigns.
Managing the email subscribers can be challenging though, especially when you have a large number of subscribers. With Zapier you can sync your new Mailchimp subscribers to your Salesforce CRM. It even allows you to update and add contacts to Salesforce based on recent form submissions.
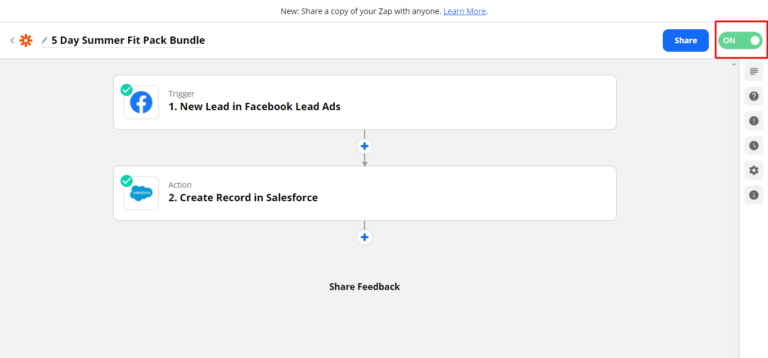
2. Facebook Lead Ads
Facebook Lead Ads tend to have higher conversion rates when it comes to forming submissions. This is because user information is already added and saved directly within Facebook which has been game-changing for the platform.
With Zapier you can ensure that these leads are packaged and added to your CRM for future use.
This will enable your sales and marketing teams to easily target your Facebook leads. You can even automatically enroll certain users in specific campaigns and sequences.
Wrapping Up
What could be better than having a single application to enable multiple integrations for your Salesforce? That’s why Zapier’s in demand for so many day-to-care core operations at any business. And we want you to make the most of the Salesforce CRM bring pulling in more data for your workflows,
We’ve provided you with the downloadable PDF guiding you to set up Salesforce integration using Zapier. Still, if you need any help or want to know what integration works for your current processes, our certified Salesforce consultants are always at the ready to assist you with sound advice.
Have a Message For Us?
Please fillup the form and send your message.
Rejuvenate email strategy
with Pardot and Marketing Cloud
Most digital marketers would agree with the fact that email marketing is at the core of their marketing programs. They find it one of the most democratic channels to engage with customers because no one ‘owns’ email. It’s second only to search in this regard.
According to Salesforce, email marketing has an average ROI of 3,800%. The average return on every dollar invested is $38.
The number clearly states the importance of email marketing for businesses. If you’re currently using Salesforce, you may have heard a lot about Pardot and Marketing Cloud which can help to take your email strategy to the next level.
What is Salesforce Pardot?
Salesforce Pardot (now renamed as Marketing Cloud Account Engagement) is a part of the Salesforce Marketing Cloud and is specifically designed to improve customer engagement and marketing approaches followed by businesses.
Pardot enables businesses to track and measure the performance of customer interaction conducted by each representative, understand user behavior, and customize the content according to their expectations and interest.
With the Pardot marketing automation tool, you can effectively schedule and send personalized emails to thousands of prospects. It allows you to use responsive templates, which can be reused. It’s a great platform to create and send emails that deliver personalized experiences to all your prospects individually.
However, Pardot has so many features that might get you thinking about where to start. Let’s look deep into the features that make Pardot a good way to get started with your emails.
1. List Segmentation
Every business maintains a database to collect information related to customers like purchase history, email addresses, conversation threads, etc. With the help of Pardot, you can gather this data more quickly, thus saving you time to focus on other revenue-generating tasks.
Pardot can also be used for segmenting this data to create customized campaigns. These campaigns can be based on purchase history, location, or any other attribute.
For example, suppose you are organizing an event in California and wish to invite your customers who are based in California; instead of scanning each and every contact you can simply segment them using Pardot and send customized emails to your customers based in California with a simple click.
2. Lead Generation and Management
The first step you need to focus on before starting with lead nurturing is to find out the email address of the potential customer.
Pardot has different features like landing pages and drag-and-drop forms, social media posting, along with analytics on acquisition like organic / paid searches. It thus provides the marketing team with all the necessary resources and tools to gather email addresses.
3. Email Marketing
Email marketing is the major segment where Pardot comes in and revolutionizes the entire process of how you interact with potential customers through emails.
Pardot allows authorized users to create list emails using the pre-designed templates, which you can easily change according to the type of recipient or nature of the email.
The base package of Pardot allows you 10,000 email addresses. But you can also purchase blocks additionally to fit the unique marketing needs of your business.
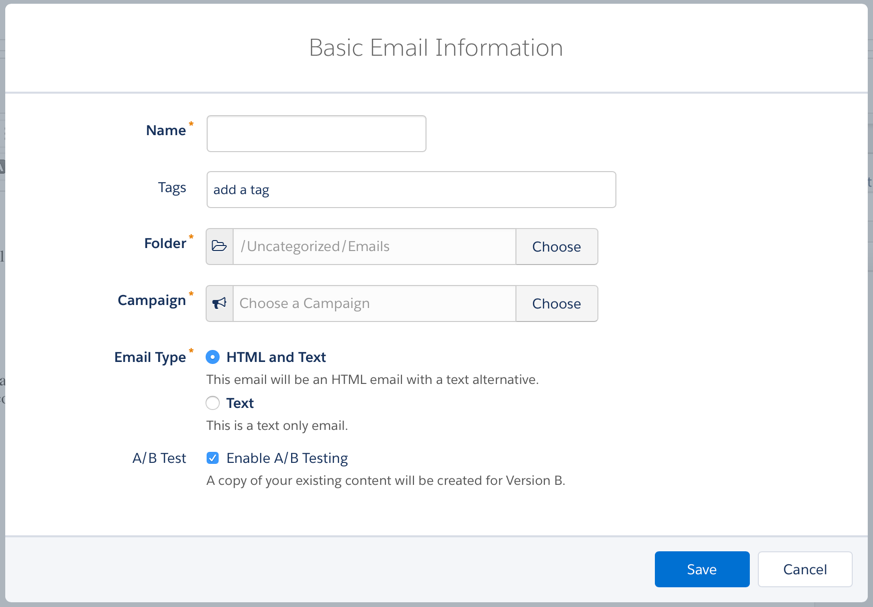
4. A/B Testing Emails
Let’s consider a situation when you have two similar email templates but are not sure which one of the templates would be the right choice to go with for a special feature.
Pardot provides you with the A/B testing feature to gauge the performance of each of the templates. It will help with sending different types of emails to groups you selected, thus helping you to choose the template that will work best in any specific kind of scenario.
5. Tracking Email Opens
Pardot allows you to track the engagement of your emails accurately, helping you to keep a count of people who have opened the email you sent. So how does this work?
Pardot inserts a single-pixel image in HTML emails. Whenever a person opens that email, the image starts to load, and it is counted as an HTML open.
This amazing feature of Salesforce Pardot makes it easy for businesses to track how well they are engaging with the market. Simply planning the campaigns and sending emails is not enough. You have to be aware of the outcome of those emails too. Salesforce Pardot can give your business that extra push you need to pull in more leads.
What is Salesforce Marketing Cloud?
Salesforce Marketing Cloud is a customer relationship management (CRM) platform that helps marketers of companies from different industry verticals allows to create and manage marketing campaigns and relationships with customers.
The Marketing Cloud supports integrated solutions that simplify customer journey management, mobile, email, social media, advertising, content creation and management, and data analysis.
The platform supports advanced features like predictive analytics that help marketers with decision-making. For example, it helps distinguish what channel would be preferable for a particular kind of message. It also incorporates Journey Builder to tailor campaigns to customers’ behavior and needs, communication channel preferences, and demographics.
Marketing Cloud holds great importance when it comes to running successful email campaigns. Let’s dive into some practices that marketers can follow using Marketing Cloud to boost their email marketing campaigns.
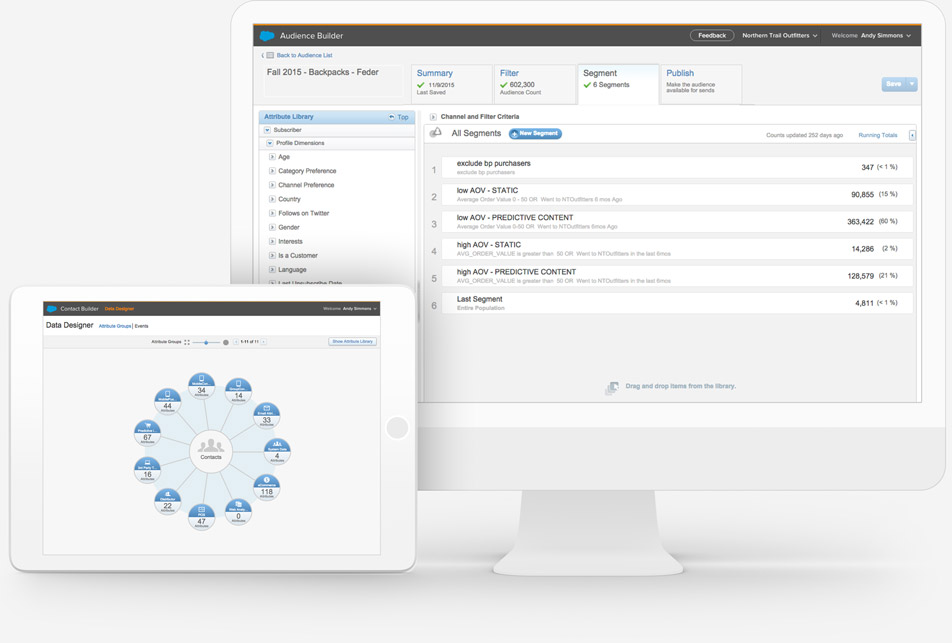
1. Segment Your Audience
With the marketing landscape becoming customer-focused, it is now irrational to believe that your target audience includes just a single identical group that you can reach out to through your generic campaigns.
You should consider using Marketing Cloud for its AI and predictive analytics to segment your audience in Audience Builder and to look for new and relevant audience segments for your business.
2. Personalization
In today’s world where customers are constantly bombarded with multiple emails from different brands, you need to work on something unique that surely catches their attraction. That’s where personalizing your emails would help you.
Marketing Cloud support Einstein AI that helps you to discover your customer interests, purchase history, and preferences, so that you can reach out to them with just the right offer.
3. Increase Customer Reach
No brand would ever want to lose its customers and this is why it is always important to connect them with something they prefer or they won’t hesitate before unsubscribing from your email list.
You can use Marketing Cloud here to access sequencing and predicting attribution to create the right message for customers using Content Builder and send them out on their preferred channels, at their preferred time.
4. Analyze Your Campaigns
Marketing Cloud allows you to access capabilities like data normalization, probabilistic attribute, and harmonization to get a complete view of your email campaign performance and cost. This will help you identify your improvement area so you can plan your future campaigns better.
Pardot vs Marketing Cloud
Let’s have a look at some key differences between Pardot and Marketing Cloud to know what works better for your business.
1. Pardot is not specific towards any industry, while Marketing Cloud focuses more on the retail sectors, like travel, entertainment, FMCG, and health.
2. Salesforce Pardot is mainly used in the context of email and social channels, whereas Marketing Cloud is used for SMS, to display ads, email, and social.
3. In Pardot, lead nurturing is possible using drip marketing campaigns for tracking your website behavior and qualifying leads based on scoring. It is something that’s not possible with Marketing Cloud.
4. Pardot is suitable for a simple database and use-case but for complex use-cases, you should always choose Marketing Cloud.
5. Pardot is majorly used in companies that have less number of customers but higher sales volume. On the other hand, Marketing Cloud is suitable for companies with huge and varied customers needing special attention but they have a lower value of sales conducted by them.
6. Pardot enables the best marketing and sales alignment for B2B teams. On the other hand, Marketing Cloud is considered great for managing 1:1 customer journey communications with multiple channels.
What’s Next?
Your customers these days are smarter and more informed than ever. That’s why you always need to run top-notch email campaigns that they expect and deserve. After all, why not make the most of your preferred marketing automation platform!
Implement Pardot and Marketing Cloud with the help of certified Salesforce experts and step ahead to send smooth emails like cream cheese on a bagel – The Salesforce Way!
Have a Message For Us?
Please fillup the form and send your message.
5 Free Apps from AppExchange to Make Your System Work on Steroids
It’s quite fascinating that Salesforce has a broad ecosystem of more than 3,000 AppExchange applications that can help you extend your use of CRM.
Whether it is about adding automation to your business processes or improving business productivity, you can find AppExchange apps that can help you increase your customer base and propel business ahead.
We can help you find apps that are used most often to optimize business operations and improve business efficiency & productivity. Even better, let’s find you some free AppExchange apps that can turbocharge your Salesforce journey.
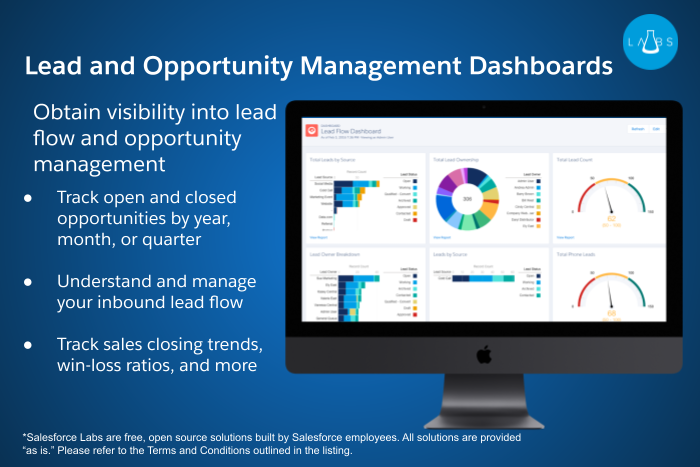
1. Lead and Opportunity Management Dashboards
These two dashboards allow you to wrap visibility around Lead flow and Opportunity Management.
Here are the features that you can access from the two dashboards:
Lead Dashboards:
This dashboard allows you to track lead counts, ownership, and general status, and record the source and conversion information.
Opportunity Dashboards:
The dashboard allows you to track closed business for an Year/Quarter/Month. You can also track win/loss ratios, sales closing trends, the top revenue-generating accounts, and much more.
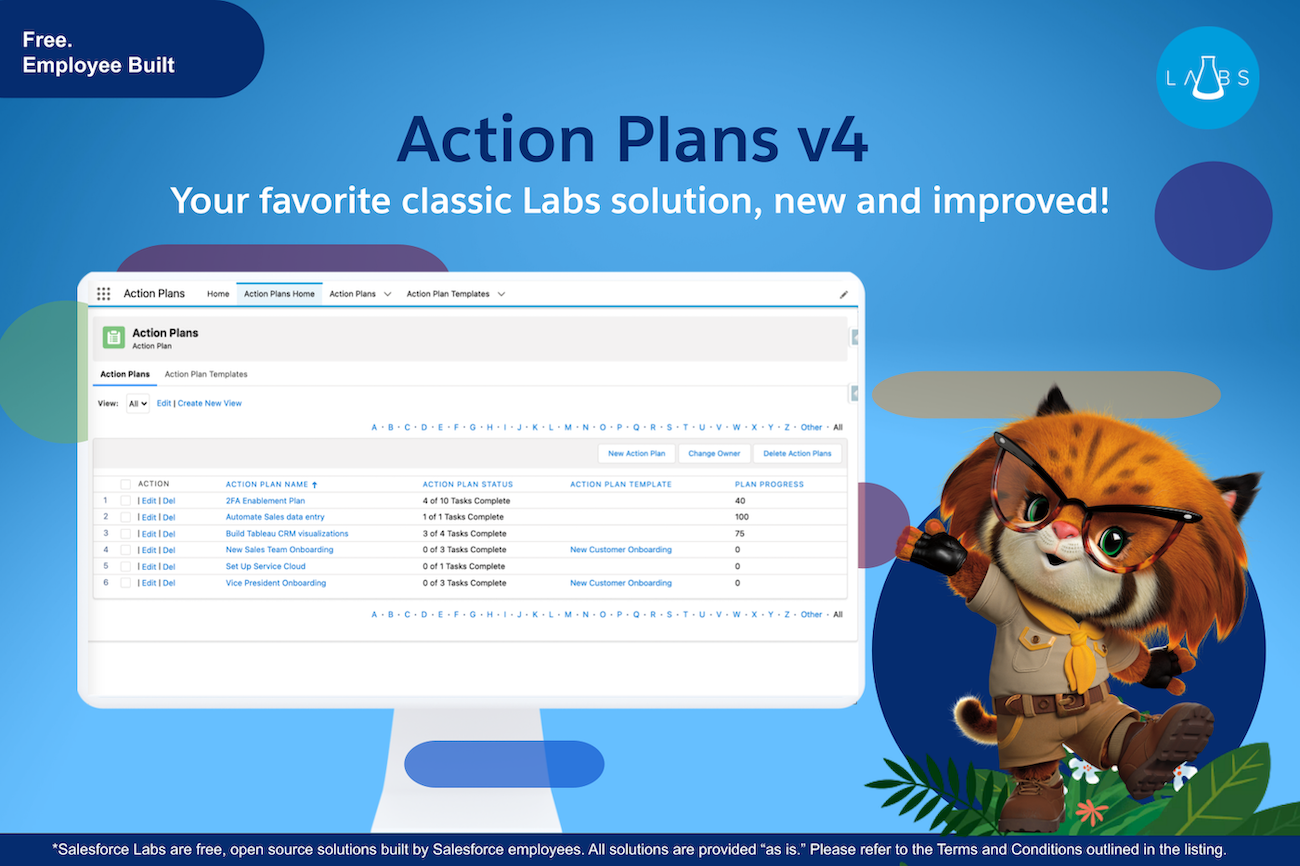
2. Action Plans
Action Plans is the app that helps to encapsulate best practices into shareable and reusable task templates. With the latest version of the application, you can create action plans for any standard or custom object, even by using Flow or Apex Code.
The app allows you to create action plans for an Account, Lead, Contact, Opportunity, Case, Campaign, or any Custom Object. You can pre-assign tasks to a specific individual or auto-assign them to the running user of the parent record.
If you’d like to integrate your Action Plans with custom flows, objects, processes, etc., there are many customization guides that you can access.
Here are some of the key features of the app:
You can import/export and share your Action Plan Templates with other Salesforce org.
The app supports task reminder times and controls behavior around Chatter Notifications. It takes action when a Lead is converted and defaults Task assignment behavior.
You can activate Action Plan creation from a template in Process Builder and Flow using invocable Apex.
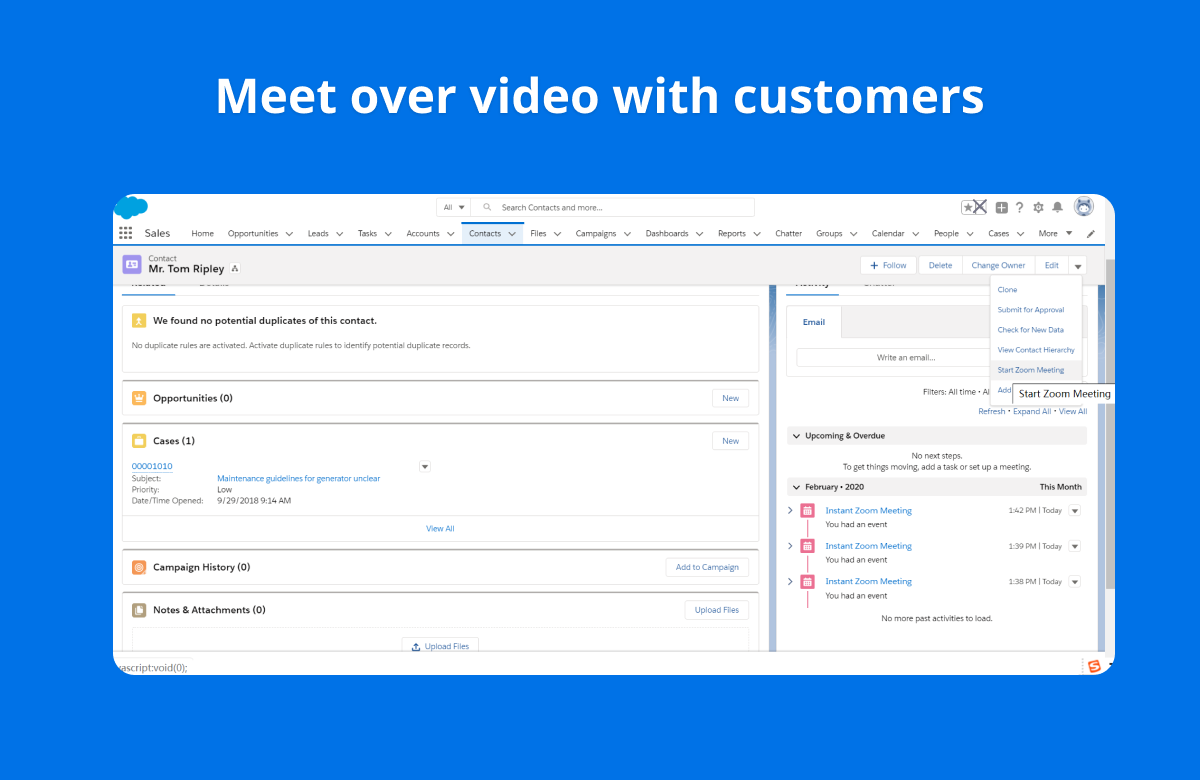
3. Zoom
The app enables Zoom’s native integration with Salesforce that helps you to seamlessly meet with your customers, scale webinars, and efficiently manage your sales calls.
Teams can open Zoom Meeting with contacts with a few clicks and the interface is ubiquitous. You can also record your conversation in your Salesforce activity history. The application enables you to schedule or start a Zoom Webinar, add leads and contacts as registrants, and track participation.
Additionally, you can use the Zoom Phone dialer to manage your Zoom Phone calls. You can automatically log call activity and your contacts are populated directly from the Salesforce interface into your Zoom Phone.
These are some of the key features of the application:
You can seamlessly start a Zoom Meeting and track it in your Salesforce activity history.
You can automate syncing Zoom Webinar attendee information and webinar participation to contacts.
The app allows you to manage your inbound and outbound sales calls and sync call notes automatically when using the Zoom Phone soft dialer.
4. Sales Activity Dashboards
For sales professionals, this dashboard can do a wonderful job to maintain visibility of the types of activities their sales teams are engaged in, related to different Opportunities.
This app is helpful in team selling environments where all executives work together and have to manage and track activities related to sales consulting engineering, and professional service representatives.
The key features of the application are:
Enhanced visibility of sales activities
Help with custom reports based exclusively on the out-of-the-box application
Visibility of work rate of sales professionals
Identification of neglected Opportunities and Accounts
5. ZoomInfo Field Trip
Ever wish you could run reports on the fields you have in Salesforce? Want to achieve that perfect, clutter-free page layout that could make tracking fields easier? Unpopulated fields in your Salesforce Org cause confusion, making the basic admin duties more difficult.
ZoomInfo Field Trip is the app that helps users to analyze the fields of any object, what percentage of records have that field populated, fields that are unused, and determine the overall health of your data.
The app allows you to analyze the fields of any object and get an instant insight into what percentage of your records have that specific field populated.
Here are some of the key features of the application:
Easily run reports to identify your unused fields that can be removed to improve overall Salesforce health.
Generate your ZoomInfo Data Quality Score depending on the fill rate and weight of the fields.
Go beyond your Contacts, Accounts Objects, and Leads to conduct a complete audit of your fields.
Field Trips can make it quick and painless to analyze your fields with an intuitive user interface and easy-to-export report.
Final Words
It’s safe to say that whenever you want to enhance your usage of your Salesforce Org, there can be an AppExchange app that can help you right away.
You can start with all the apps that we listed above to boost your productivity with Salesforce and track performance alongside.