Organizations should be excited about the day when they have to collect payments, but usually, this isn’t the case. Instead, the team dreads evaluating all those information and managing recurring payments and debts. Managing all of it manually while avoiding errors can be a challenge.
But collecting and managing payments doesn’t need to be this hard. The good thing is Salesforce allows you to automate your payment process by enabling integration with different payment gateways.
Integrating Salesforce with the most popular and secure payment gateways has become a standard deal, especially for e-commerce businesses.
As a trusted Salesforce consulting service, we’ve helped our clients and their finance teams from different industry segments and e-commerce to benefit from an automated payment process while using Salesforce.
Automating your payment process in Salesforce is something you can do by considering the choice of your payment gateway.
This article will cover a few of the most common payment gateway integration with Salesforce to simplify and streamline your payment process. But let’s start by determining the ways you can address challenges faced in the payment process.
Ways to Address Challenges to the Payment Process
Fast-growing organizations seek ways to ensure seamless transactions that support security, speed, and compliance. You can automate and manage these payment processes using the following methods.
1. Conducting Reusable API Integrations
It can be complex for companies to manage secure online payments, and building entirely new systems can make the process even more complicated.
Lost transactions and payment delays can become common challenges.
In such a case, you can work with reusable API integrations rather than building an entirely new system to make the process easier, even for non-technical users.
2. Digital Payments Platforms
With increasing regulations around online payments, aligning with compliance and security standards has become essential.
Compliance failure can not just lead to insecure transactions but can also bring along penalties.
You must consider using trusted and compliant digital payment methods and gateways for utmost data protection.
3. Tokenization and P2PE
Fraud and malware attacks are usually connected to financial transactions.
This makes it essential to give crucial importance to online payment security. You can consider using point-to-point encryption (P2PE), fraud management filters, and tokenization to protect your payment gateways.
Now, let’s discuss your top options for payment gateways that you can integrate with Salesforce to automate your payment process while ensuring secure transactions.
PayPal Integration
One of the most common payment gateway organizations for international payments is PayPal, which is used as a Payflow Pro setup. With PayPal Payflow Pro, users can conduct automatic and seamless online payments and track it all within Salesforce.
Achieving a robust integration will help you look for or create Salesforce Contacts, and construct opportunities right from PayPal sales, thus eliminating the hassle of managing contacts from different platforms.
Enable quick and easy online payment with PayPal Express Checkout and track it all with Instant Payment Notification.
The integration enables companies to use a glitch-free and risk-free payment method for secure payments, protecting them from malware.
Being available in over 200 markets globally and accepting 100 currencies, PayPal is the best choice for managing international business transactions.
PayPal saves you from duplicate payments, using APIs for every transaction.
Stripe Integration
Another effective solution to manage invoicing, payment and finances in a better way is by using Stripe. Salesforce integration with Stripe enables you to automate your critical processes and helps you save valuable resources and time while maintaining secure transactions.
The tools and APIs of Stripe are tailored to help businesses to manage business transactions, issue refunds, easily manage processing orders, and keep multiple subscriptions on track.
The Stripe API is REST organized and uses HTTP response codes to indicate any API errors. It uses built-in HTTP authentication to return all API responses to ensure secure transactions.
Here are some features you can access with Salesforce Stripe integration:
You can synchronize Stripe customers with Salesforce and make direct payments from the CRM without switching to Stripe.
The integration enables automatic recognition of customer data, thus making it easier to manage recurring payments.
You can maintain a coupon or subscription model to make your marketing process more engaging with an integrated system.
As Stripe supports WebHooks, it makes it easier for organizations to work on building real-time systems for better productivity.
There are many other payment gateways that you opt to integrate with Salesforce. All you need is the best Salesforce consultants to guide you through the steps.
Wrapping Up
Secure transactions are the key to running a business and making profits. There are better ways to handle complex transactions than manually handling everything, especially when dealing with hundreds of clients and vendors.
Considering our Salesforce integration services is your way to bring automation to your payment management, giving your team the ease they seek to maintain error-free transactions.
Have a Message For Us?
Please fillup the form and send your message.
Learn more about Einstein Bots and how they can help
Artificial Intelligence, or AI, has become the savior for many companies, whether for customer service, marketing, or sales operations. We can be sure that technology will stay at the heart of any organization and support humans in its most interactive ways.
Still, handing over customer interactions to a machine can be a massive leap of faith for some companies that prefer peer-to-peer engagement or concierge treatment.
And yet, Ai-infused chatbots are considered the most functional and effective in driving customer engagement. They simply can’t be written off.
If you are a business running on Salesforce, you can leverage the power of chatbots through Einstein Bots.
And as a Salesforce consulting agency, we’ve helped many of our clients to acquire the power of Einstein Bots and use AI technology to boost their productivity and improve customer service.
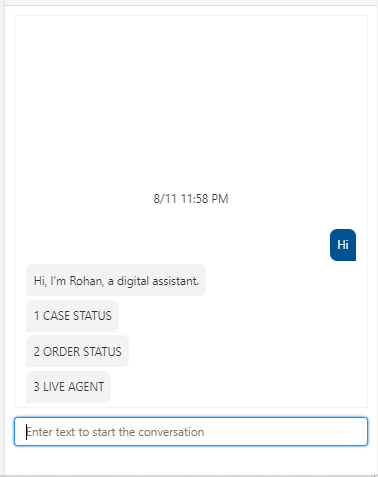
What are Salesforce Einstein Bots?
The Salesforce Einstein Bots are automated chatbots that companies actively use for customer support or sales enablement.
Whether you have a concerned customer with an issue or a browsing prospect who wants to know more about your products, Einstein Bots enable you to offer a seamless experience without any need for the customer to intervene.
Einstein Bots works on the technology of NLP (natural language processing) to understand what customers are saying in the Chat and direct them to what they need.
Einstein Bots have been around since the Summer 18’ release, but with every release, there have been new improvements. You can now even use Flows to query Salesforce records and more information for the Bot to work with.
How Using Einstein Bots could be Helpful
To understand Einstein Bots better, let’s look at how using the feature can be helpful for companies.
The response speed is the prime benefit of using Einstein Bots. It helps to reduce wait times in the queue by answering common questions immediately in a chat window instead of waiting for a response from any channel. Ultimately this results in fewer cases logged.
Bots can handle the most common issues or queries, giving agents more time to resolve complex problems requiring more effort and creativity.
Bots are highly used to instantly welcome customers with a branded greeting in a chat window. After the greeting, they’ll direct them to the online resources they need without human intervention.
Bots can also learn how to respond to customers appropriately and let agents do the heavier lifting using NLU (Natural Language Understanding) technologies.
Prerequisites for using Einstein Bot
Before you can start using Einstein Bots, there are a few prerequisites that you need to keep in mind:
Make sure you have a Service Cloud license and a Live Agent license
You must set up Omni Channel
Conduct the Live Agent Deployment
Set the Live Agent Chat button to routing type: Omni-Channel
The agents must be Service Cloud users
A Queue for your Chatbot agents
Conduct a Snap-in Deployment for hosting the Einstein Bot
After you’ve maintained these prerequisites, you can get started with using Einstein Bots!
These prerequisites might seem intimidating and challenging to set up if you’ve never used Live Agent. That’s where hiring Salesforce consulting services can help you.
How to Implement Einstein Bots
Now you know the importance of Einstein Bots. It’s time to understand how you can implement it.
1.
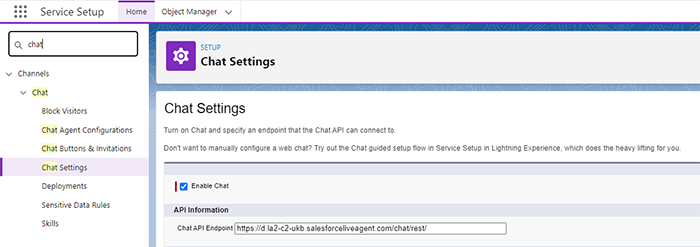
You must enable Chat in your org. Go to Setup; in Quick find, search for ’ chat.’
Select Chat Settings. Click Enable Chat.
2.
You have to implement either Chat or Messaging. You must connect it to a Chat implementation or a Messaging channel To use your Einstein bot. You can also use both together too.
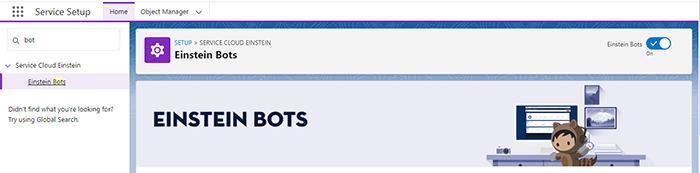
3.
Navigate to Setup. Search for Einstein Bots in the Quick Find box.
4.
Enable Einstein Bots by clicking on the toggle.
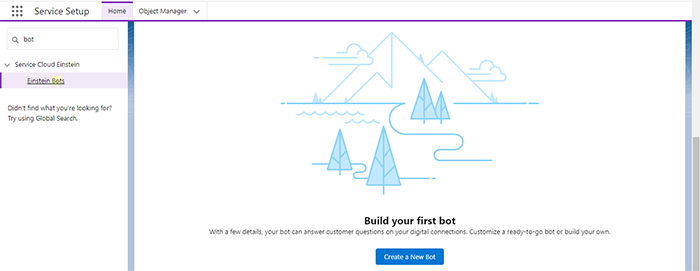
5.
After enabling the bot, click “New Bot” to create your new first bot.
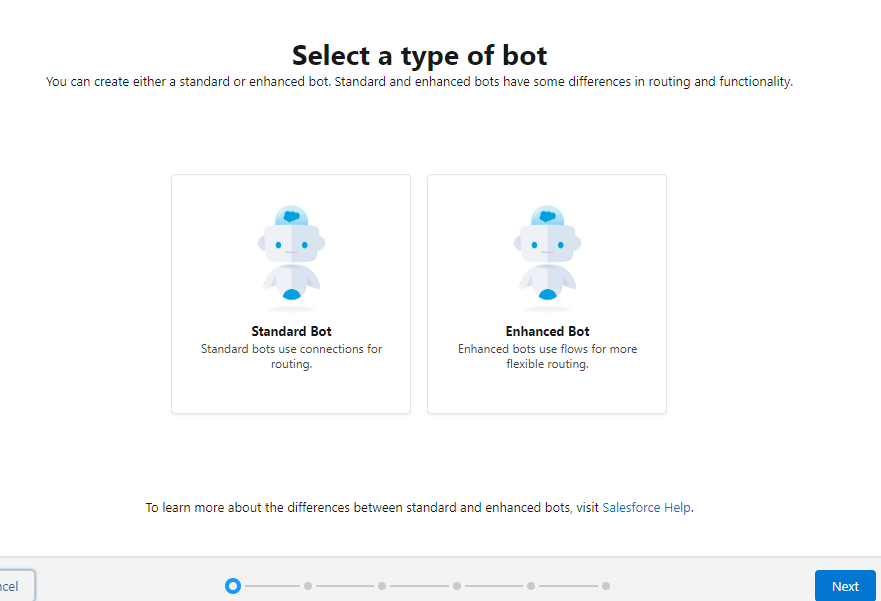
6.
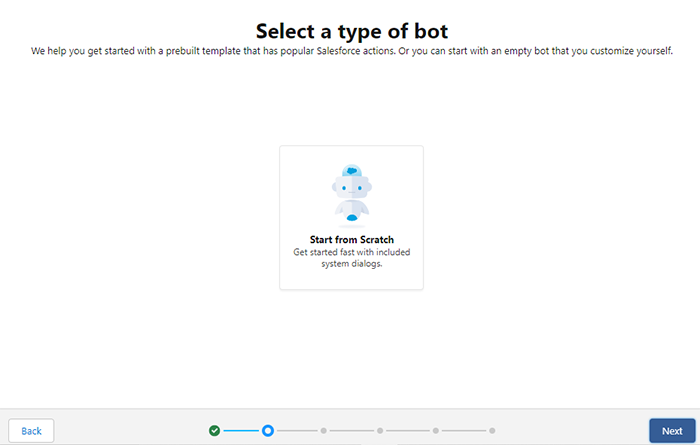
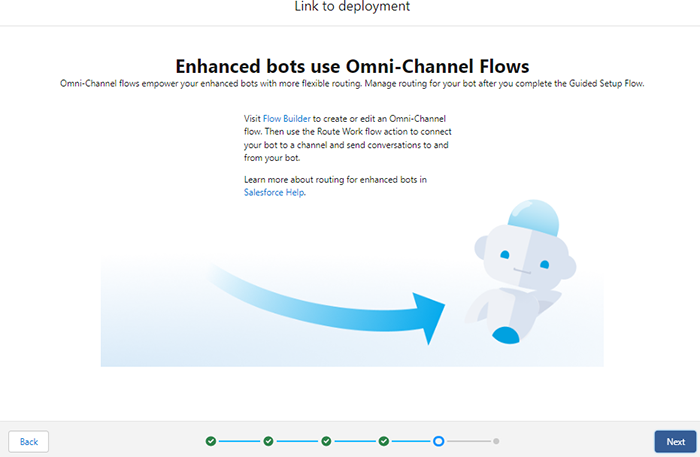
Choose the type of your bots, which could be Standard or Enhanced.
Standard bots are the basic bots, whereas when you use Enhanced Bot, you’ll get more personalized conversational experiences with added security.
7.
Select Start from Scratch if you’re creating the first Bot in your org.
8.
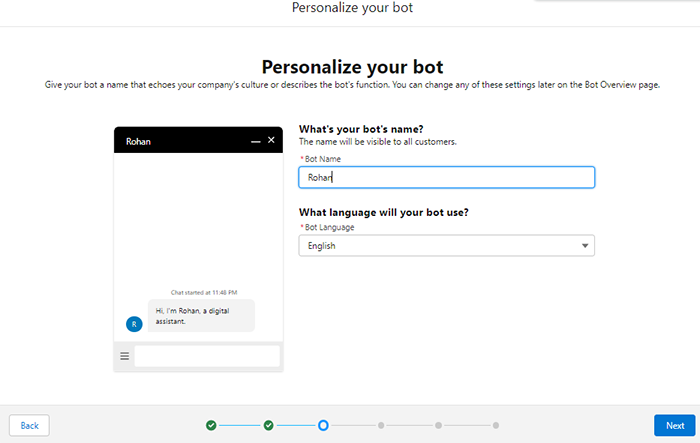
Give your bot a Name to personalize it. Also, select the language the Bot will use to conduct communication.
9.
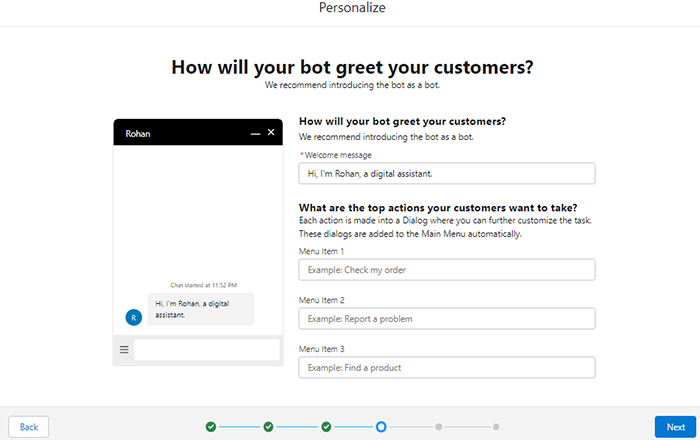
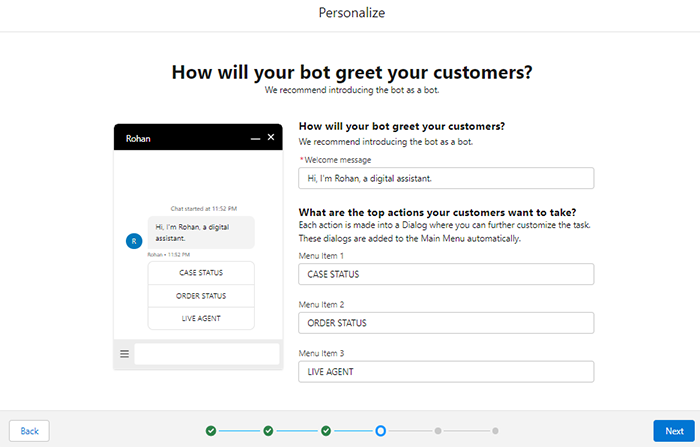
You must now define the Welcome message and actions that users could quickly use.
10.
Click ‘Next.’
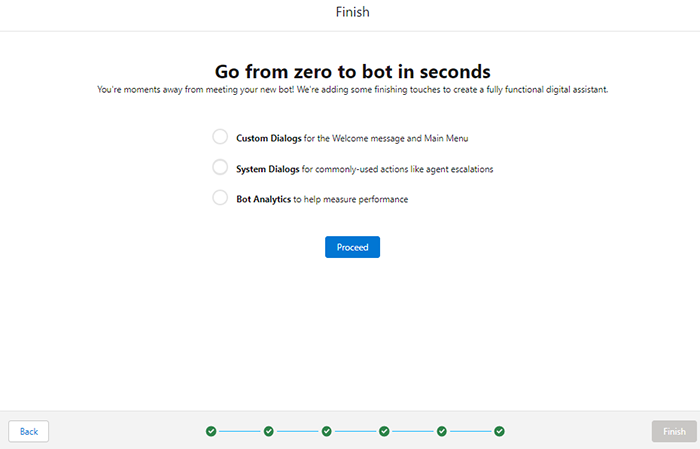
11.
Click ‘Proceed.’
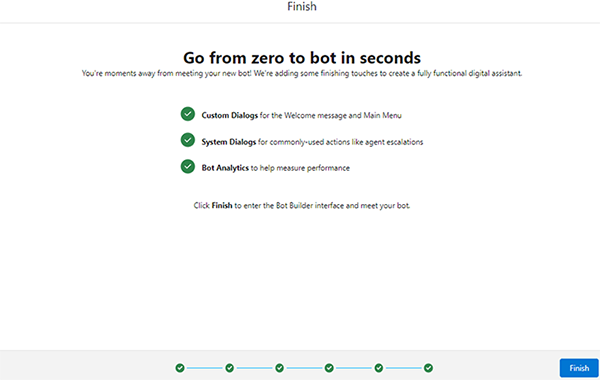
12.
Click ‘Finish.’
13.
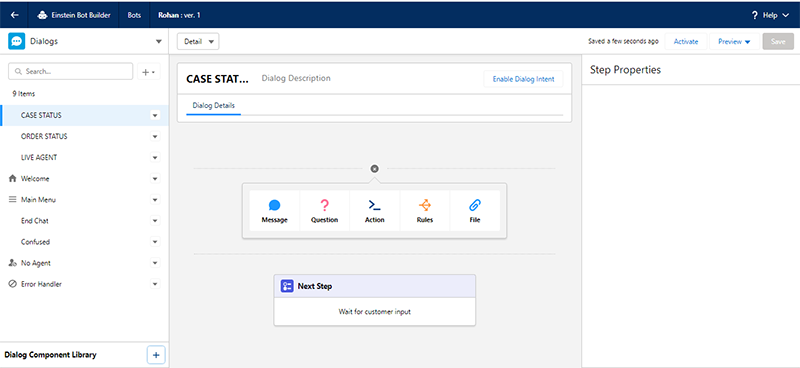
When you’re at this stage, link your actions/Menu.
14.
Click ‘Activate.’
15.
Once you have activated the bot, this is how it will appear.
It is important to set the right expectations to implement a chatbot properly.
There’s a human customer on the other end of the Chat, so you must let them know they’re interacting with a digital assistant. But that doesn’t mean it should feel inhuman.
For best results, work on customizing your chatbots with a name and a personality that stays on brand. You should also consider ‘interaction design’ to design message responses and next steps for customers, which are intuitive, helpful, and easy to navigate.
There are lots of things that you have to keep in mind when getting Einstein Bots up and running. To make that easier for you, our Salesforce consultants are always ready to help you out. Talk to us to learn more about Einstein Bot and why it matters to your business.
Have a Message For Us?
Please fillup the form and send your message.
Let's automatically route leads and Customer tickets to your teams with Omnichannel
Suppose you’ve worked in the Salesforce ecosystem for a long time, whether as a developer, admin, or user; it’s likely that you’ve heard of Salesforce Omni-Channel. But do you know what it is and how to set it up?
Salesforce Omni-Channel is a popular feature of Service Cloud and is highly used. As the name implies, Omni-Channel simply means “all channels,” allowing customer service agents to handle customer queries via all channels so they can deliver a consistent experience. Let’s unpack more about omnichannel.
What is Omni-Channel?
Customers always expect flexibility when they look for support from a company. Some customers prefer email, while some work with service portals, some with web chat or SMS, and others still go with the convenience of a phone call.
The support team must be able to connect with customers, but how are they supposed to juggle customer concerns coming in from all different directions? Enter Omni-Channel to the rescue, and we as a Salesforce consulting firm would help you get the best out of it.
According to Salesforce, Omni-Channel forms The Three Cs — Complete, Consistent, and Connected. Omni-Channel helps you provide a comprehensive and complete customer experience regardless of the channel. It ensures a consistent experience while making it easier for agents to manage the work.
Salesforce Omni-Channel Routing to Automate Your Case Assignments
Getting the proper support request to the right agent can be challenging if you’re running customer support. Support centers receive numerous customer requests from various sources, with varying customer needs.
Traditionally, Case Assignment Rules are used for case assignments in Salesforce. These simple automation rules help send cases to individual users based on case criteria or a holding queue. Agents must manually review queues and pull work items out. Thankfully, there’s a better solution now to simplify the work.
Salesforce Omni-Channel Routing supercharges this traditional queue assignment process with automated assignments from queues directly to the suitable agents.
It enables an agent to log into the routing system and receive cases automatically from the assigned queues without needing any assignment. The feature is smart enough to consider the agent’s capacity, age, and priority of the work item while assigning any query.
Ways Salesforce Omni-Channel Can Help You
Different ways Salesforce Omni-Channel can help you are mentioned below:
It helps you route Incoming work to queues based on the case type and details.
Supervisors can manage queue assignments by easily assigning agents only to queues they are trained on. It ensures that the right agent with the needed skill set gets the case.
Supervisors can also manage the number of cases an agent can handle simultaneously. Cases get automatically routed when they come into agents with the availability and capacity to handle the case. If no agents are available, the cases wait in the queue and go to the next available agent.
Agents only get work when they log in. This ensures they don’t get work when they’re out of the office or on break.
You can also access the Salesforce Omni-Channel Supervisor app so team leads and managers can see their agents with assigned workloads and the cases waiting to be assigned. All of it can be accessed in one view instead of navigating multiple dashboards and reports.
How to Enable Omni-Channel in Salesforce?
The feature of Omni-Channel sounds pretty awesome, doesn’t it? But how do you set it up in Service Cloud? Let’s walk through the steps involved in the basic Omni-Channel setup.
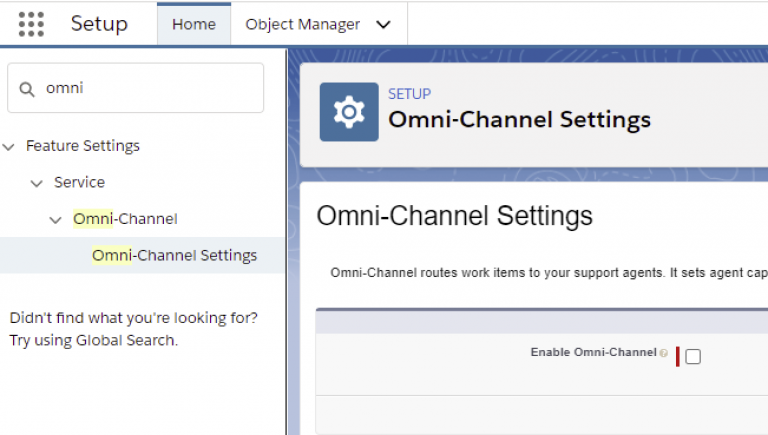
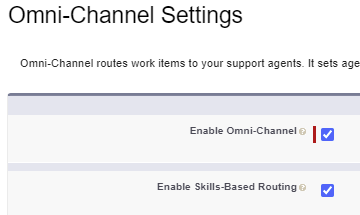
1. Enable Omni-Channel
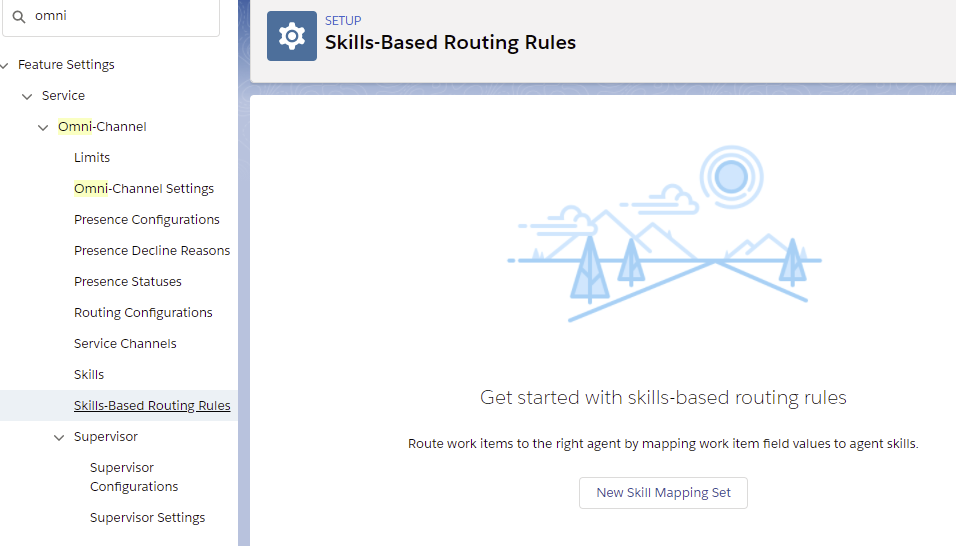
To turn on the feature, go to Setup > Feature Settings > Service > Omni-Channel > Omni-Channel Settings.
You can also do so by going to Service Setup > Administration > Omni-Channel > Omni-Channel Settings. You can also simply type “Omni-Channel” in Setup Quick Search.
You’ll see the box Enable Omni-Channel. Check it and click Save.
2. Omni-Channel Routing
The most important thing for which Omni-Channel is used is routing. With Omni-Channel, there are three routing options — Queue Based, Skill Based, and External.
We’ve provided here a quick setup guide for Queue-Based and Skill-Based Routing. External Routing setup can go slightly differently depending on your third-party app.
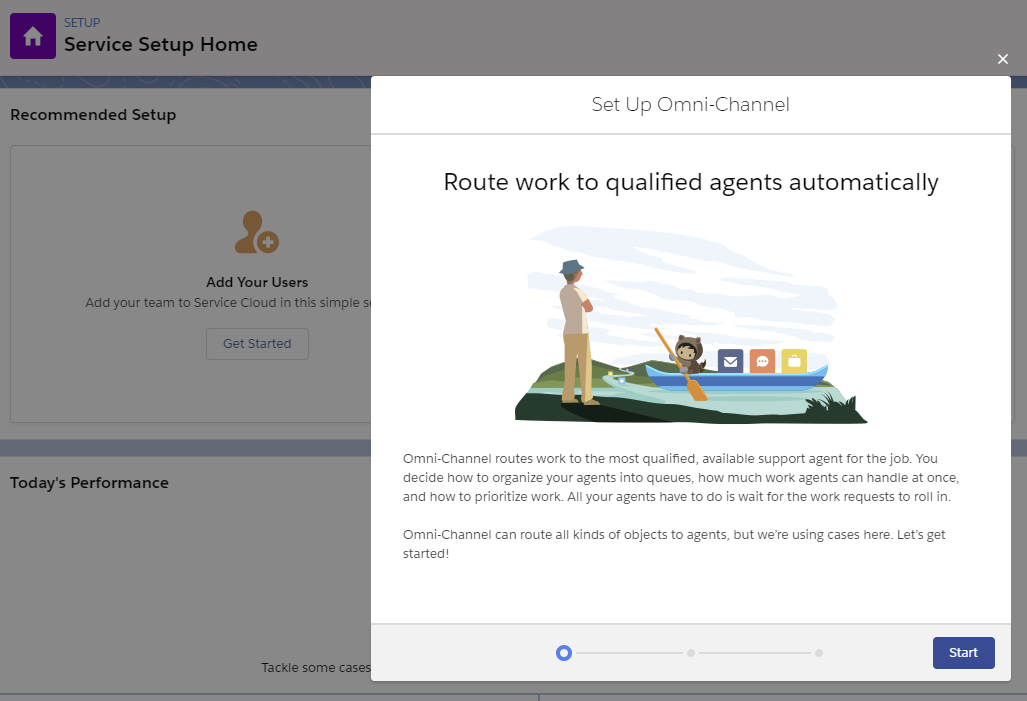
Queue-Based Routing
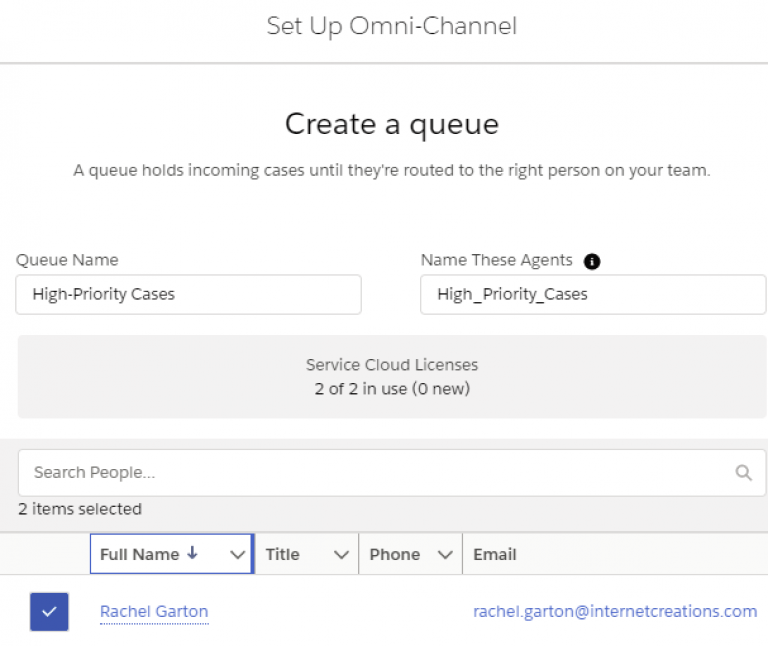
Queue-based routing is pretty straightforward, and Salesforce even has a simple setup flow to start the process. Go to the Omni-Channel Setup Flow in Service Setup.
In the setup flow, create a queue and assign specific agents to that queue. You can leave the Agent Workload settings as the default.
Skill-Based Routing
Skill-based routing is capable of handling more complex customer service needs. But it is also more complicated to configure.
Step 1
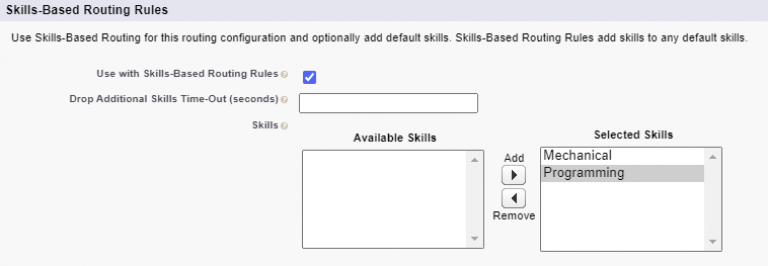
Check the box to Enable Skill-Based Routing in Omni-Channel Settings.
Step 2
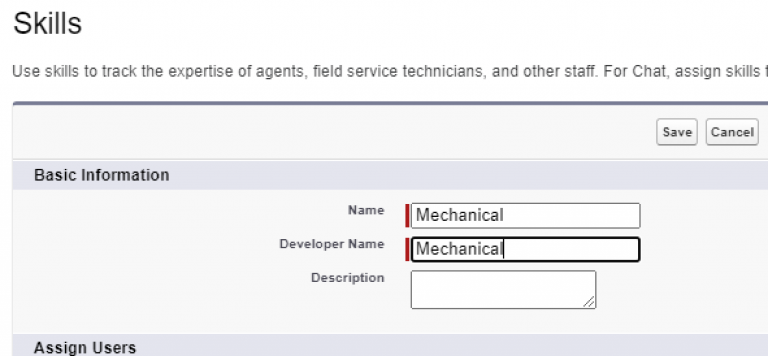
Then you have to configure skills for your agents. For example, let’s use “Programming” and “Mechanical” skills for a random gadget company.
Go to Omni-Channel > Skills in setup. Then click New and create basic skills. You don’t have to worry about assigning users yet.company.
Step 3
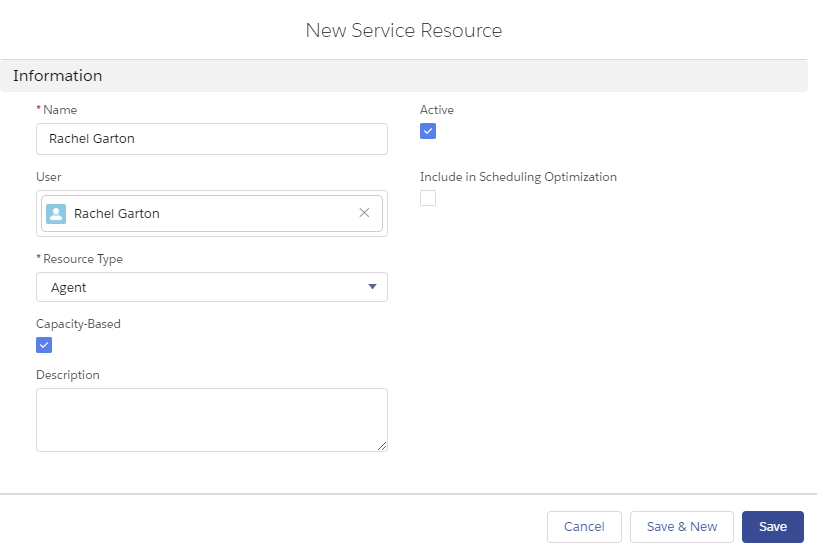
Next, you’ll create Service Resources to link agents (users) to skills.
You must find the Service Resources object in the App Launcher and create New. Then Active service resources for your agents.
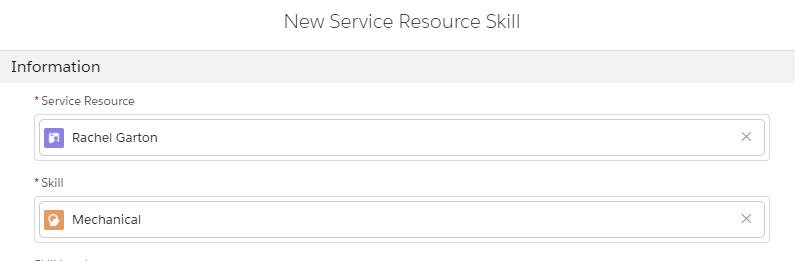
Now add the skills to the resources in the Skills-related list.
Step 4
Now you have to tell Omni-Channel how to use the skills for routing the work.
Go to Skills-Based Routing Rules in Setup and select the New Skill Mapping Set button.
Create the skill mappings for defining field values to align with specific field requirements.
For example, cases with a Case Type of ‘Mechanical’ will be aligned with the Mechanical Skill.
Lastly, you just have to ensure any existing Routing Configurations are enabled for using the necessary skills.
Omni-channel is not just a good idea for a business but a necessity. Today’s customer expects a company to deliver a connected experience, and Salesforce omnichannel makes that possible. Agents can now easily handle multiple conversations simultaneously to achieve maximum productivity and customer satisfaction.
The attached PDF will guide you well when setting up Salesforce Omni-channel. But if you get stuck or need assistance, consider contacting our best Salesforce consultants for the best support.
Have a Message For Us?
Please fillup the form and send your message.
Sign the Forms Digitally and Speed up your Processes
Paperwork doesn’t always mean actually handling work on paper for legal binding.
But for someone who wants these documents to be more enforceable, a few changes to the documentation process can make all the difference. What you need here is a dedicated eSignature app to simplify adding digital signatures.
Whether you want an app to electronically sign a document or want to send documents out to get them digitally signed by other business partners, we’ve got just the right recommendations for you.
We’ve tested many signature apps, and these are the five best apps that you can consider using to accelerate documentation:
1. DocuSign
If we talk about the most popular electronic signature apps available, DocuSign will always be on top of the list, and for good reasons.
The application is great to use and it consists of all features that people look for in an eSignature app.
It’s pretty straightforward to get started with DocuSign:
Step 1. Sign up for a free trial.
Step 2. Almost immediately it will ask you to upload a document.
Step 3. Prepare the document for signatures
Step 4. Send it to recipients.
DocuSign enables users to easily keep track of lots of different documents you manage at different stages of the signing process.
In the Manage dashboard, you’ll find a sidebar with an Inbox for any ‘envelopes’ or documents you’ve received. The Sent box will have the documents you’ve sent, and in the Drafts tab, you’ll find the documents you’re working on.
Here’s a run-down of DocuSign’s top features:
The app helps to maximize your Salesforce investment and streamline your processes, thus boosting productivity.
You can use Salesforce data to create agreements with Salesforce data.
The documents that are signed along with the signer-provided data is automatically written back to Salesforce.
DocuSign supports a clicks-not-code configuration, making it easier for teams to deploy it quickly without complex integrations across multiple clouds.
DocuSign eSignature meets multiple compliance standards like HIPAA, 21 CFR Part 11, ISO 27001-certified, and FedRAMP.
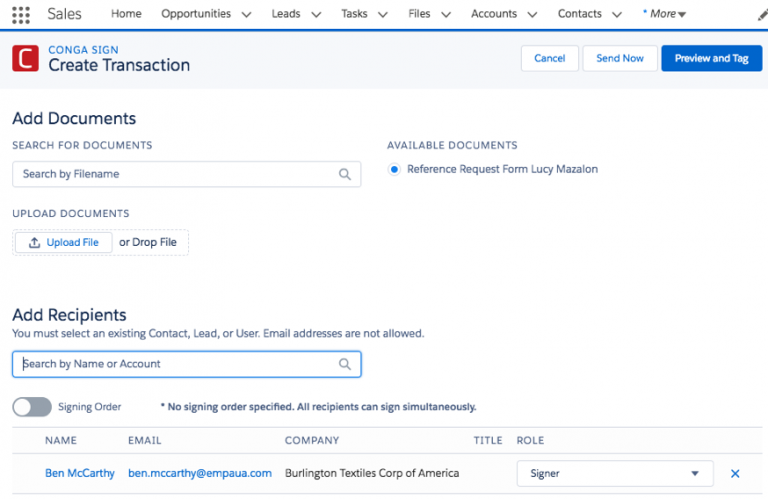
2. Conga Sign
If you’re still capturing signatures the old-fashioned way, you surely would have observed how slow and needlessly complicated the process is. You can completely transform this experience of yours with Conga Sign.
The application enables users to secure the signatures needed for business-critical transactions with efficient and fast eSignatures, thus speeding up the process. We’ve listed some of the benefits that the app offers:
The app allows you to speed up approvals and reduce the time to confirmation, which earlier took days.
It securely allows you to sign documents, helping you save money, and reduce risk while creating an efficient signing experience.
The app supports global compliance. It complies with multiple global regulations for eSignature, like eIDAS, the ESIGN Act, and UETA.
Another interesting thing about the app is that it seamlessly integrates with other Conga products like CLM, Composer, and CPQ. You can access one-click integration by Composer to send eSignature requests right when you create documents.
3. PandaDoc
We all like to get paid, and this is something PandaDoc is making happen easily. The app seamlessly makes getting paid a part of your contract signing workflow, even when you’re using a free plan.
You can set the application ensuring when someone signs documents that you’ve sent, they simply enter their credit card information and get charged. If you’re someone who sends contracts to people for a specific service, PandaDoc can prove to be a great way to tie all processes together.
PandaDoc can be integrated with different payment gateways, including Square, Stripe, and PayPal.
To set up payments, create an account with the specific gateway that you’re willing to use, then go to Settings > Integrations > Payment Gateways and enable the setting.
You should note that PandaDoc isn’t exclusively for collecting payments,
and you can do lots of other things with it as well.
The app allows your clients to attach files to the document so can send contracts out for signing without them.
The dashboard of PandaDoc lists the dollar value of the contracts at every stage of the signing process. It even has sections for Paid and Unpaid contracts.
You even get three sample documents that are a sales proposal, an invoice, and a sales quote.
4. HelloSign
HelloSign is one of the best alternatives to DocuSign and is now owned by Dropbox.
It’s one of the electronic signature apps that are the easiest to use. The app offers a great free plan and unlimited signature requests per month with the basic paid plan.
Once you log in, you’ll get two options to choose from:
1.
send or sign something,
2.
create a template (when you’re using a paid plan).
Apart from a simple user interface, there are many features of HelloSign that make it one of the best eSignature apps.
HelloSign supports easy integrations with cloud storage platforms. It does not just work great with Dropbox, but also with Box, Google Drive, OneDrive, and Evernote.
The app is configurable with Salesforce CPQ and Salesforce Communities.
It supports custom templates. As you’ll go to higher plans, you can access custom branding, advanced team management, and enable multiple users.
The app populates templates automatically with Salesforce data.
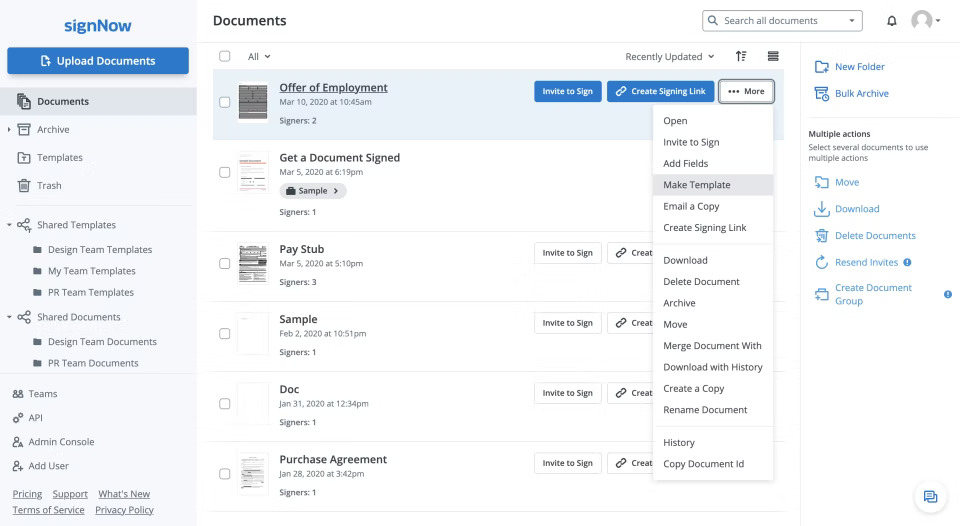
5. signNow
For some companies, paperwork can be a team effort requiring approvals and reviews. In such situations, you would need employees from different departments to collaborate and conduct document verification before they are sent out.
Many electronic signature apps charge a significant cost for each user and as you keep adding two or three extra accounts, the cost goes double or triple. That’s where you need signNow, the application which makes it all easy and at a low cost.
This is one of the most favorite apps for small teams as it doesn’t have a separate personal or individual plan.
The Business plan of the application starts at $20/user/month when paid monthly. But if you go for an annual payment, it’s just $8/user/month; affordable, isn’t it?
We’ve listed here some of the amazing features that we found while using the app.
You can add fillable fields along with Salesforce annotations.
The app allows you to bind data to form fields. It enables automatic update of Salesforce records once a form is filled.
You can set reminders and the document expiration date.
You can manage multiple signers and set their specific orders.
Wrapping Up
We’re sure that all these applications for E-Signature in salesforce will simplify your day-to-day processes, helping you speed up your workflow. Although, there are many other apps we could cover we just greatest hits for you. Feel free to look around AppExchange for more gems that suit your process and capability needs.
So go ahead. Try out these apps and if you face any difficulty or need some guidance, our certified Salesforce experts are just a call away.
Have a Message For Us?
Please fillup the form and send your message.
5 Best AppExchange Apps to bring in Sales Productivity
Sales team productivity has always been a constant topic of conversation in the industry — and for a good reason.
According to the third edition of Salesforce’s State of Sales report, sales representatives tend to spend only 34% of their time actually selling their products and services.
That same research also mentioned that sales reps end up spending too much time on administrative tasks like inputting sales data, managing emails, and creating follow-up tasks.
We did the heavy lifting here, so you didn’t have to. We’ve compiled a list of the five best Salesforce apps from AppExchange that can help to extend your CRM functionalities to improve your sales team’s productivity.
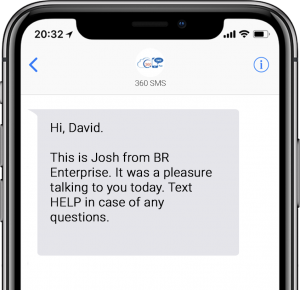
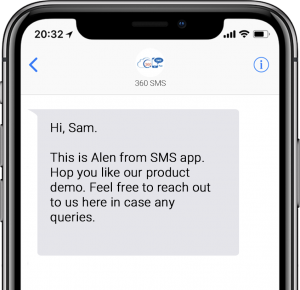
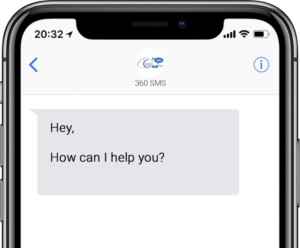
1. 360 SMS App
360 SMS is a powerful app natively built on the Salesforce platform. The application empowers users to communicate effectively with Customers, Prospects, and Business Partners across the globe through different SMS features like single/ bulk SMS/ MMS.
The app also supports anonymous features like Automation, SMS templates, Link Building, etc. to help teams connect with a large number of clients.
360 SMS App has the capability to conduct effective marketing of your products and services, helping you to reach more and more clients in a fast, easy and effective way.
The app helps you increase your customer reach with short and crisp informative messages. With the app, you don’t have to send out long descriptive emails anymore and see your business grow like never before.
The top features of the 360 SMS app include:
Automated/Triggered Texting:
You can send messages with process builders, workflows, or Apex methods.
Batch Texting AKA Bulk SMS:
You can run bulk SMS campaigns via Reports, Views, or Campaign.
Conversational 1-on-1 Texting:
You can access threaded text messages on any object with the Conversation View VF page.
SMS Templates:
Access SMS templates that are easy to create and can be customized with any object and associated field.
Hyperlink Click Tracking:
You can even add hyperlinks to your SMS that can be tracked, so you can know how many people have clicked on the link.
Email Alerts on Incoming SMS:
Get email notifications for incoming SMS to speed up the response time on the SMS.
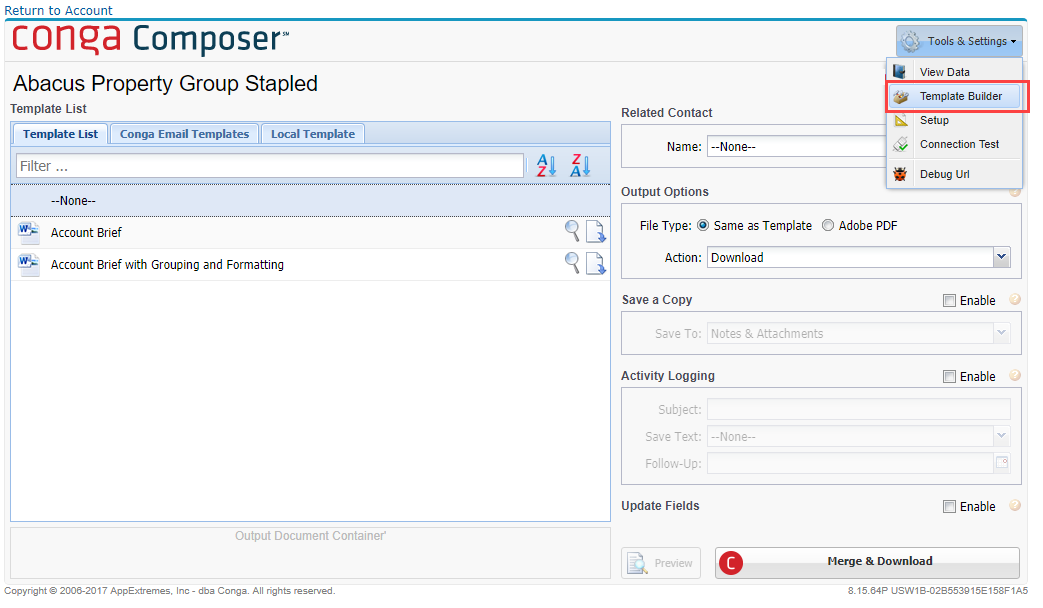
2. Conga Composer
Conga Composer helps to streamline workflows by automatically populating richly-formatted templates to create sophisticated digital documents. It is one of the highly used apps on the Salesforce AppExchange, that has been offering global solutions for more than 8,000 customers.
You can develop everything from quotes to invoices to contracts using pre-built or customized templates with data automated from Salesforce
Even if you need to merge data from multiple systems with various media attachments, Conga Composer allows you to do so. This will allow you to speed up necessary communications without wasting time and effort on reformatting data.
The top Conga Composer App features include:
Document format conversion Pre-built or customized templates Workflow automation Salesforce data automation for various document creation Document delivery
3. Docusign
The app enables Zoom’s native integration with Salesforce that helps you to seamlessly meet with your customers, scale webinars, and efficiently manage your sales calls.DocuSign is the most popular electronic signature (eSignature) solution for businesses. The application has over 500,000 customers — including Salesforce.
This popular eSignature platform helps to increase sales productivity by allowing you to pull in information from Salesforce and use it to automatically generate agreements.
The app allows you to capture, track, and store information without having to leave Salesforce. DocuSign also offers bi-directional mapping that helps to remove human error with automated data entry.
Top DocuSign App Features:
One-click eSignature requests Document storage Agreement process automation Salesforce data automation for various document Bi-directional information mapping
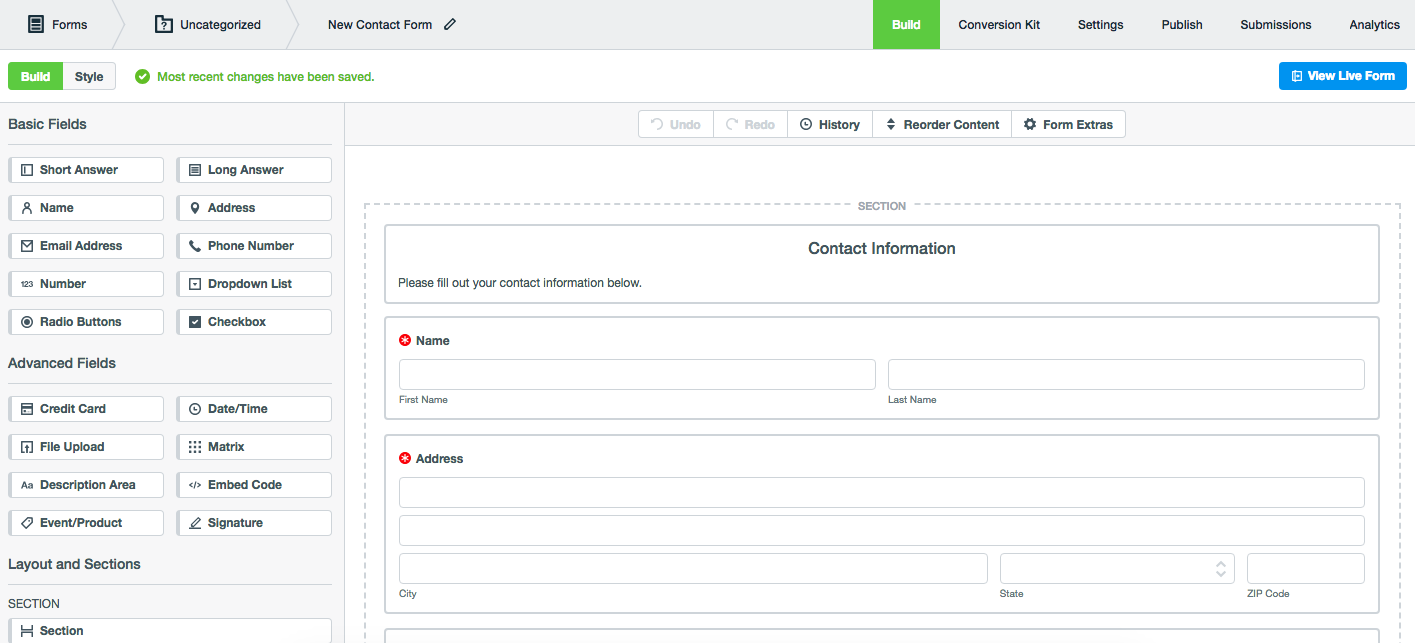
4. Formstack
Formstack allows you to build a form, customize the design, and collect data directly within your Salesforce org. You can dynamically prefill data from any object, which will ultimately improve form experience and increase productivity.
The app helps to:
Eliminate Data Silos:
You no more have to deal with paper forms and data silos. Formstack for Salesforce helps to automate the entire process, from data collection to digital signature.
Save Valuable Time:
Formstack for Salesforce automates your most tedious processes to eliminate time-consuming, repetitive tasks.
Consolidate Your Tools
Formstack provides you with a comprehensive suite of tools for Salesforce through which you can automate documents, build digital forms, and collect e-signatures without having to leave Salesforce.
The top features of the app include:
Native Builder Salesforce Drag-and-Drop Form Builder Progressive Data Capture Payment Processing Community Cloud Forms Powerful Security (compliance for HIPAA, FedRamp, and FERPA)
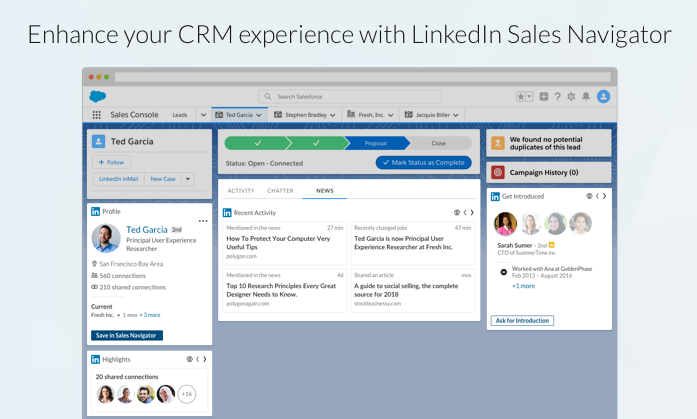
5. LinkedIn Sales Navigator for Salesforce
This app allows sales professionals to leverage Embedded Profiles without leaving their CRM. They can search for key insights on buyers, stay updated on relevant events, news, and activities, see recommended leads and send InMails directly to contacts.
Admins can use LinkedIn Sales Navigator for Salesforce to customize the interface and create a more immersive experience to fit their team’s needs.
Here are some more interesting features of the app that makes it a great pick to bring in sales productivity.
It allows sales managers and professionals to keep CRM data up-to-date automatically with the help of LinkedIn Data Validation.
Determine contacts associated with incorrect accounts, and use out-of-the-box reports to learn about opportunities at risk.
Sales representatives can access essential contact information quicker as all customer data will be displayed on Sales Navigator Lead pages.
Reps can redirect their transmitted notes, InMails, and PointDrive views from the Sales Navigator to Salesforce.
Final Thoughts
It is crucial for businesses to find ways to increase sales team productivity to achieve visible growth on charts. Salesforce AppExchange allows you to integrate some of the best Salesforce apps that are built explicitly for improving sales productivity while ensuring the overall success of the business.
While there are numerous Salesforce apps to choose from, you can’t go wrong with any of the integrations we’ve listed above that will help your sales team productivity soar.
Have a Message For Us?
Please fillup the form and send your message.
What even is ‘Salesforce Path and Guidance Success?’ : Boost Productivity and Gather Data
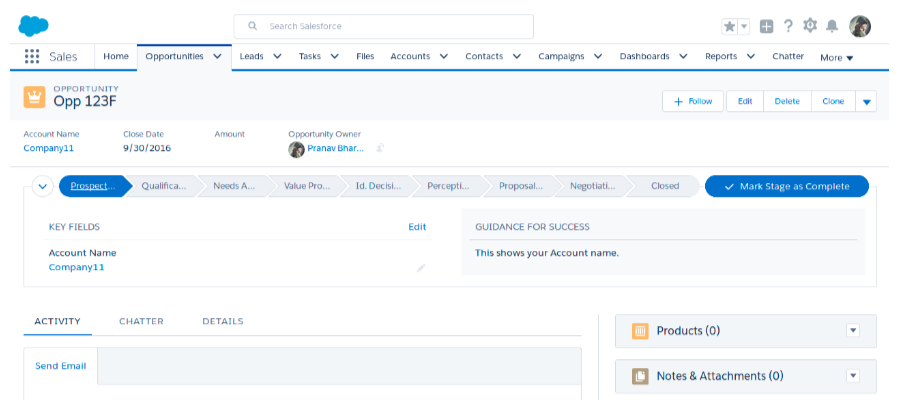
When you’re learning to work with a new system, a little guidance can help you go a long way. That’s something ‘Salesforce Path and Guidance for Success’ does for you. Salesforce Path can help guide the users through the steps of a business process, whether it is about working on a fresh lead or closing a deal.
For each step of the path, you can mention the key fields to consider and include customized guidance for success. Salesforce Path can be better stated as a visualization tool that is used on objects to guide users to a final destination, that is, the task the user wants to perform on Salesforce.
We’ve been helping our customers by implementing paths with customized guidance for success that make user adoption easier and faster. Our certified Salesforce professionals have been helping users to train them well to work on customized Salesforce solutions using paths. In this issue, we’ll cover how Guidance and Paths can boost productivity and plug problems in data capture.
Just when would you need Salesforce Path?
Implementing a Salesforce Path guides users through a series of expected actions depending on the stage of a process they’re in. This has its advantages:
It helps with training users working with the new system changes because having guidance at your fingertips is a more effective way to learn.
It simplifies new user onboarding, especially for a fast-growing organization or if you’re facing high employee turnover due to a steep learning curve.
It makes data access easier with key fields and will increase validation through Validation Rules and other required fields.
Salesforce Path Use Cases
Let’s have a look at your Guidance for Success can be helpful for different business aspects and can add ease for the employees.
1. For Sales Team- Sales Path
Sales Path is a gift to your sales reps! It helps your sales representatives to track the revenue on the go. Sales Path acts as guidance for your sales reps, helping them through each stage of the sales cycle so they can close deals faster.
You can also add chatter posts and helpful links using Sales Path to assist the sales reps in smoothly closing their deals. It enables them to break down their enormous sales process into multiple steps at different stages, guiding the sales reps through each of these stages.
Earlier the sales process only allowed reps to segregate the different stages, but with Sales Path, they can add guidelines and segregate key fields on different stages.
In short, Sales Path enables your sales reps to know where they are in the sales process and what are the next steps to take to close the deal.
Here’s a view of the Sales Path with Guidance for Success.
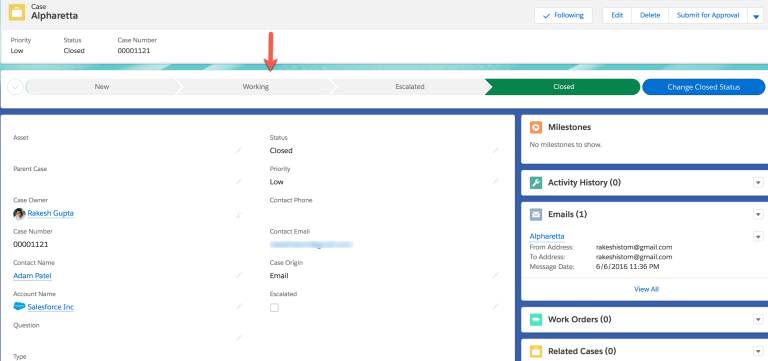
2. For Service Team- Case Path
You can use Salesforce Path to set up a flow for Case records. This will help your customer support agents to focus on the most critical information when dealing with cases. Case Path allows you to determine and customize the stages that are important to your business and also gives agents visibility of case stages.
You need to include details about critical information for each stage of the Case. You also need to add tips that would help in establishing and maintaining positive customer relationships. You can even add links to relevant feeds for the ease of agents.
Implement Path for Guidance Through Salesforce
Salesforce Path can deliver some obvious benefits, giving a boost to user engagement and adoption, thus increasing their productivity while working with Salesforce. Visualization features like Path can be the essential guide any new Salesforce user would require.
You can implement Salesforce Path and customized Guidance for Success to easily work through any business process while eliminating potential errors easily through the steps mentioned in this document. Even better, you can reach out to our Salesforce experts for a free consultation and hassle-free implementation.
Have a Message For Us?
Please fillup the form and send your message.
Improve your Lead Conversion rate by 4X with this 5-star rated App
Conversions are the lifeblood of company revenue, but they’re notoriously hard unless your follow-ups are persistent and on-point. We’re about to show you how the 360 SMS app could help you with just that.
It’s a powerful app empowers the user to communicate effectively with customers globally through single or bulk messaging over eight pre-built channels. Additionally, 360 SMS helps teams to connect with a large number of clients through features like Automation, SMS templates, Link Building, etc.
The app makes advanced SMS features easily accessible and simple to use. It gives users all the tools they need to set up journeys on any channel. It’s also a 5-star rated app on AppExchange.
Increase your customer reach with short and crisp informative messages much faster and effectively instead of long descriptive emails so your business moves conversations further meaningfully. Here’s list of key features you get out of the box.
Key Features of 360 SMS App
The Salesforce Optimizer Report is a free and simple tool that helps to remove the guesswork out of your Salesforce org, efficiently looking for potential problems in your implementation. It allows you to generate a PDF report to flag potential issues that may be responsible for hindering the performance of your instance.
The report you derive will be easy to reach and will help you identify items that are outside of what Salesforce considers the healthy range. It will also show the impact of those issues if you leave them unaddressed. Thus, it’s safe to say that Salesforce not just spots issues but also provides necessary recommendations to resolve them.
How 360 SMS App Can Help You Get More Leads
Avoid Missed Follow-Ups
You might agree that skipping follow-ups adversely affects conversion rate. To a great degree, conversions depend on how consistently you engage with your customers.
There may be other brands too that are trying to win a specific prospect at the same time. But if the offethe exhibits more commitment and stays in the prospect’s mind is more likely to convert a lead. This is the power of follow-ups.
According to IRC Sales Solutions research, on average only 2% of leads convert during the first point of contact.
Not just one, it may take two, three, or more follow-ups to convert a lead.
To stay on top of follow-ups, 360 SMS allows you to schedule a series of follow-up texts using 360 SMS drip campaigns.
The scheduled sequence of messages helps you build trust without manual intervention and pull attention to the the previous or ongoing conversation.
Example:
Follow-up text after a call 1
Follow-up text after a product demo 1
Collect Data for Segmentation and Run Targeted Marketing Campaigns
Data is the biggest asset to creating more personalized and targeted SMS campaigns. You may need a new type of data to accommodate every new use case and create a targeted marketing campaign.
So, to provide you with the ease of data collection, 360 SMS provides you with no-code and easily configurable decision trees (also called as itext). It lets you configure text Surveys, Questionnaires, and Polls with simple point-and-click capabilities.
Consequently, you can configure a sequence of questions and answers every time you want to collect a unique type of data without investing a single penny and depending on experts.
Later, you can segment customers based on the collected data and run more targeted campaigns for more conversions.
Trigger Messages Instantly and Seize the Opportunity Right Away
The more time you take to respond, the lesser leads you have in your sales pipeline. And lead generation is the very first step that helps you drive conversions.
Longer wait times may irate potential customers and compel them to switch to other competitors.
Thus, to respond immediately in the event of an incoming lead, you can automate and trigger responses to seize the opportunity right away.
On the flip side, 360 SMS incoming sidebar notify you of every incoming text. You can manage and prioritize text responses based on the user-specified color codes.
Color codes let you find out how long ago each message was received. This way, you can respond to each SMS and take necessary actions on time.
Example:
Automated text to trigger instant response
Connect with Audiences Where They Already Are
Connecting audiences over their preferred channel keep customers happy, and they are more likely to respond. This is why businesses look forward to multi-channel interactions and integrate multiple channels.
But the case is a bit different with 360 SMS when it comes to multi-channel interaction. It eliminates the need for separate integrations and provides you with 8 built-in channels for business communications.
This includes SMS, MMS, WhatsApp, Facebook messenger, WeChat, Viber, CTI, and Voicemails. Thus, you can effortlessly send single, bulk, and automated messages and connect with audiences over their preferred channels.
Get Started with the 360 SMS App
Now you know the app that can bring a difference in your lead conversion rate. Access the app to get your targeted campaigns running that could bring you more leads, thus more profits.
C-suite and sales heads need to make decisions fast and think on their feet.
But it’s hard to do that when all you have are endless rows of data records.
You need a readily available 10000 foot-view of performance for teams, departments, and business units that you can act on.
That’s something Reports and Dashboards do for us.
It allows you to customize your screen to bring attention to key metrics, especially the important ones for multiple business units and departments, thus great for quick actions that need attention.
What reports are used by sales teams
To make the most of your sales data, sales teams strategically choose the right kind of report to view and analyze their data.
The ‘track-worthy’ sales metrics change from company to company. This kind of intentional approach helps them to pull insights and meaningful information, instead of dealing with an overwhelming pile of data.
So, considering the importance of data, we’ve narrowed down
11 types of reports that business owners and sales heads need to see a 360-degree view of their business.
Examples of essential Reports and Dashboards used by teams to check Sales Productivity
Salesforce provides you the ease to set up and view your data in any of these forms of reports, provided you know the right way to analyze different types of data.
#1. Lead Volume by Source
Key metric:
The report shows the number of leads collected during a specific period of time from different sources.
Why it’s important:
Marketers tend to use many platforms to generate leads (MQL), be it social media, content marketing, or pay-per-click ads. There are always some sources that generate more leads than others and this report helps to identify that.
This report shows us the total number of converted leads against the total generated lead in some specific days, months, years, or quarters, as well as lead generated by different sources.
Why it’s important:
It helps us understand the returns on leads captured from the different lead sources that a business spends on.
The report helps to determine where you’ve lost customers by identifying gap areas and sources that contribute most to churn – you can view churn by specific salespersons, industries, or products.
Why it’s important:
A churn report can help you monitor and fix different sources of churn on time by turning attention to things like bad sales processes, industry pain points, or product offerings.
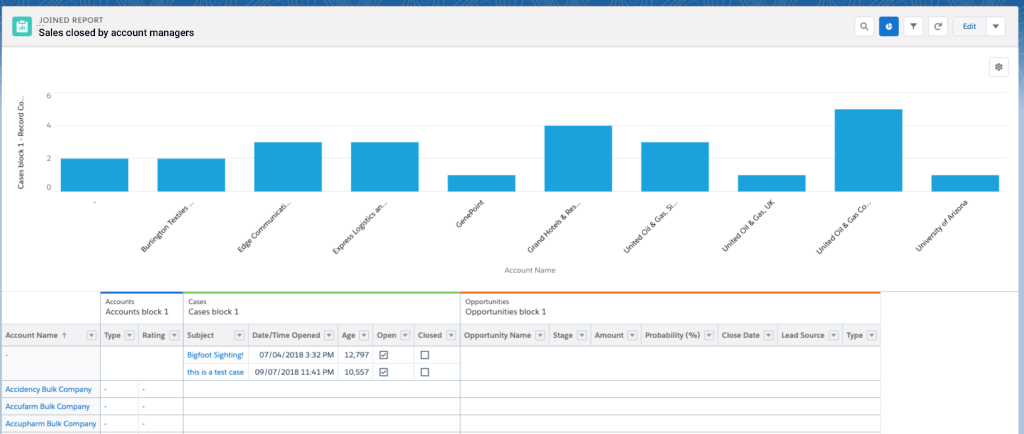
#4. Sales closed by account managers
Key metric:
This report tracks how many opportunities were won by which Account Manager and totals sales value generated by each account manager in that time frame from different sources (parameters) like industries and products.
Sales value can also be calculated quarterly, half-yearly, and yearly. Month-over-month and Year-on-Year sales values can also be compared.
Why it’s important:
This tells us which manager needs the most help and which ones deserve a bonus. Leading account managers can be asked for feedback. The report also gives teams an opportunity to check lead distribution.
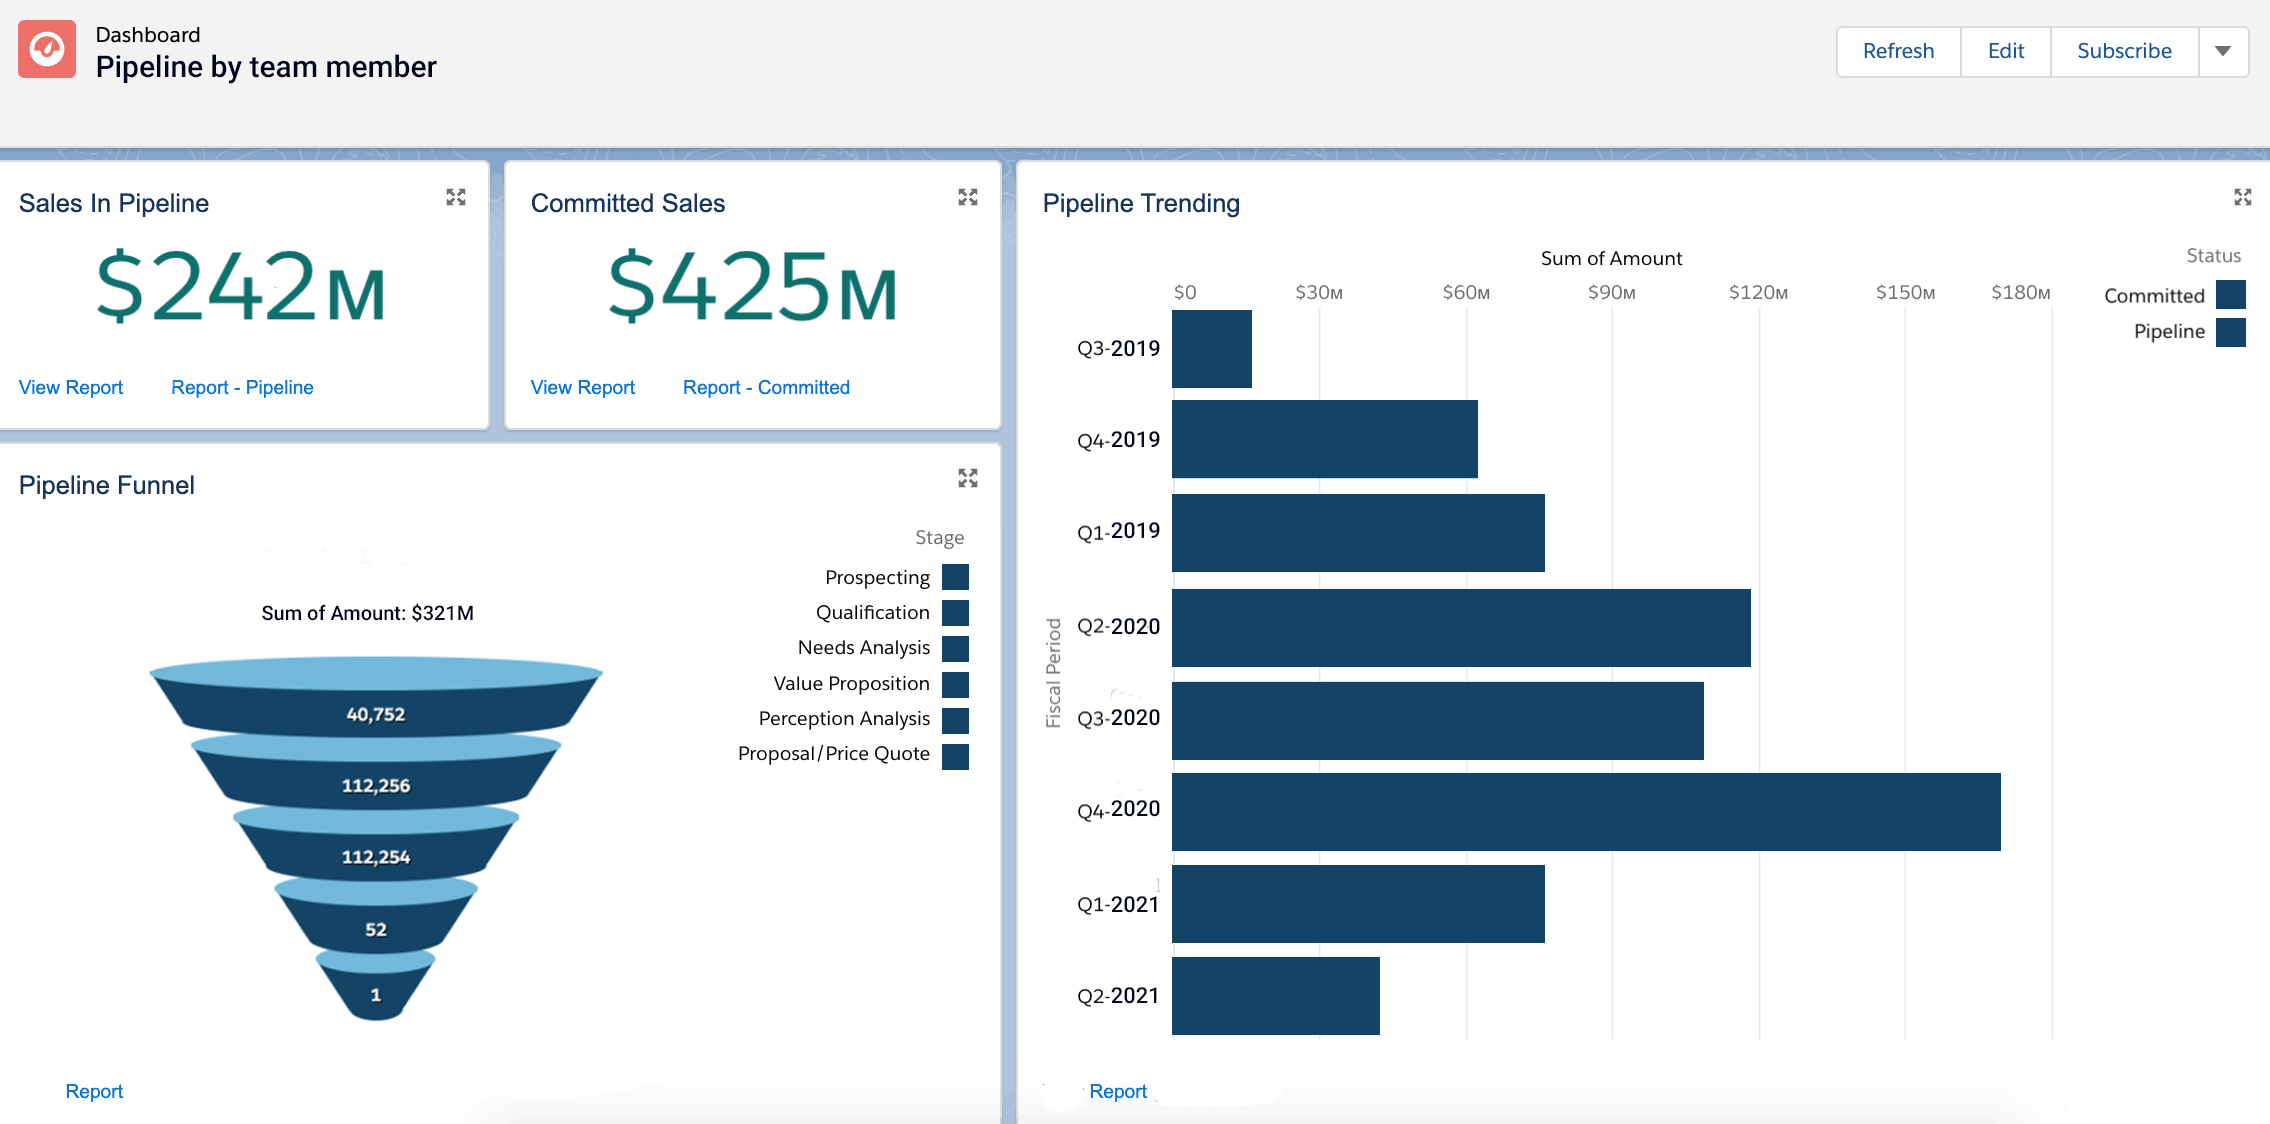
#5. Pipeline by team member
Key metric:
This report shows the value and number of open opportunities that a team member has across different opportunity stages.
Based on the criteria applied, we can also see the value of the opportunities being closed along with the number of opportunities being closed in the next 30-45 days.
Why it’s important:
Sales pipeline is arguably your most important sales team KPI.
Obviously, pipeline translates into sales.
It also shows you which opportunities have a higher probability of conversion and should be focused on. This kind of user-level pipeline data also helps to identify discrepancies in your opportunity pipeline.
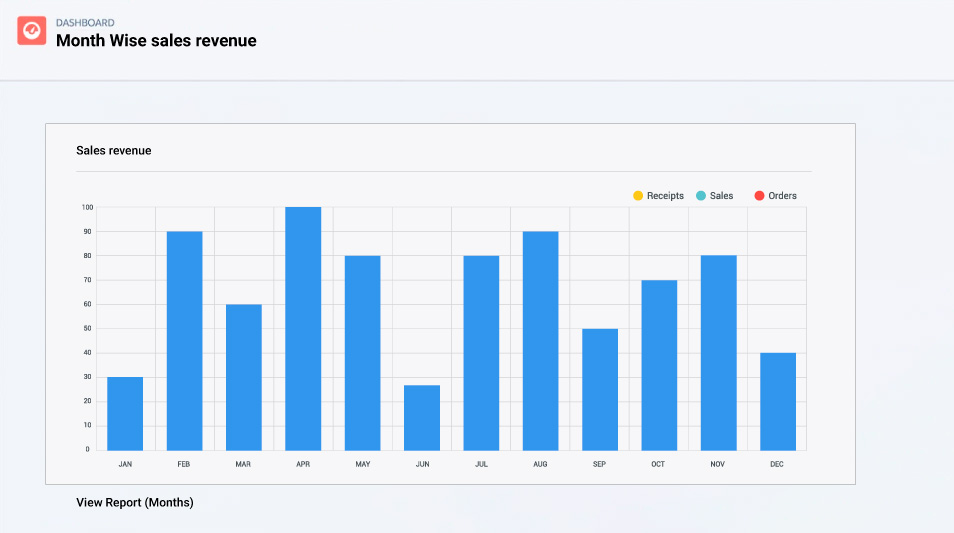
#6. Month Wise sales revenue
Key metric:
Depending on the criteria applied, this report shows you revenue contributed by a specific department or business unit, group of business units, or the entire business.
Why it’s important:
This report helps you compare monthly revenue by different business units month-over-month. It also tells you the most important months in the year for sales teams in different business units to plan their yearly holidays, peak selling times, and other events.
#7. Typical conversion rates report
Key metric:
This report shows us the typical conversion rates of different team members, business units, or across the company.
Why it’s important:
It provides insights into a team member’s or business’s ability to convert prospects into leads and leads into customers. It also tells you how efficient individual and overall strategies are.
The report helps teams identify where they are weaker in the sales cycle.
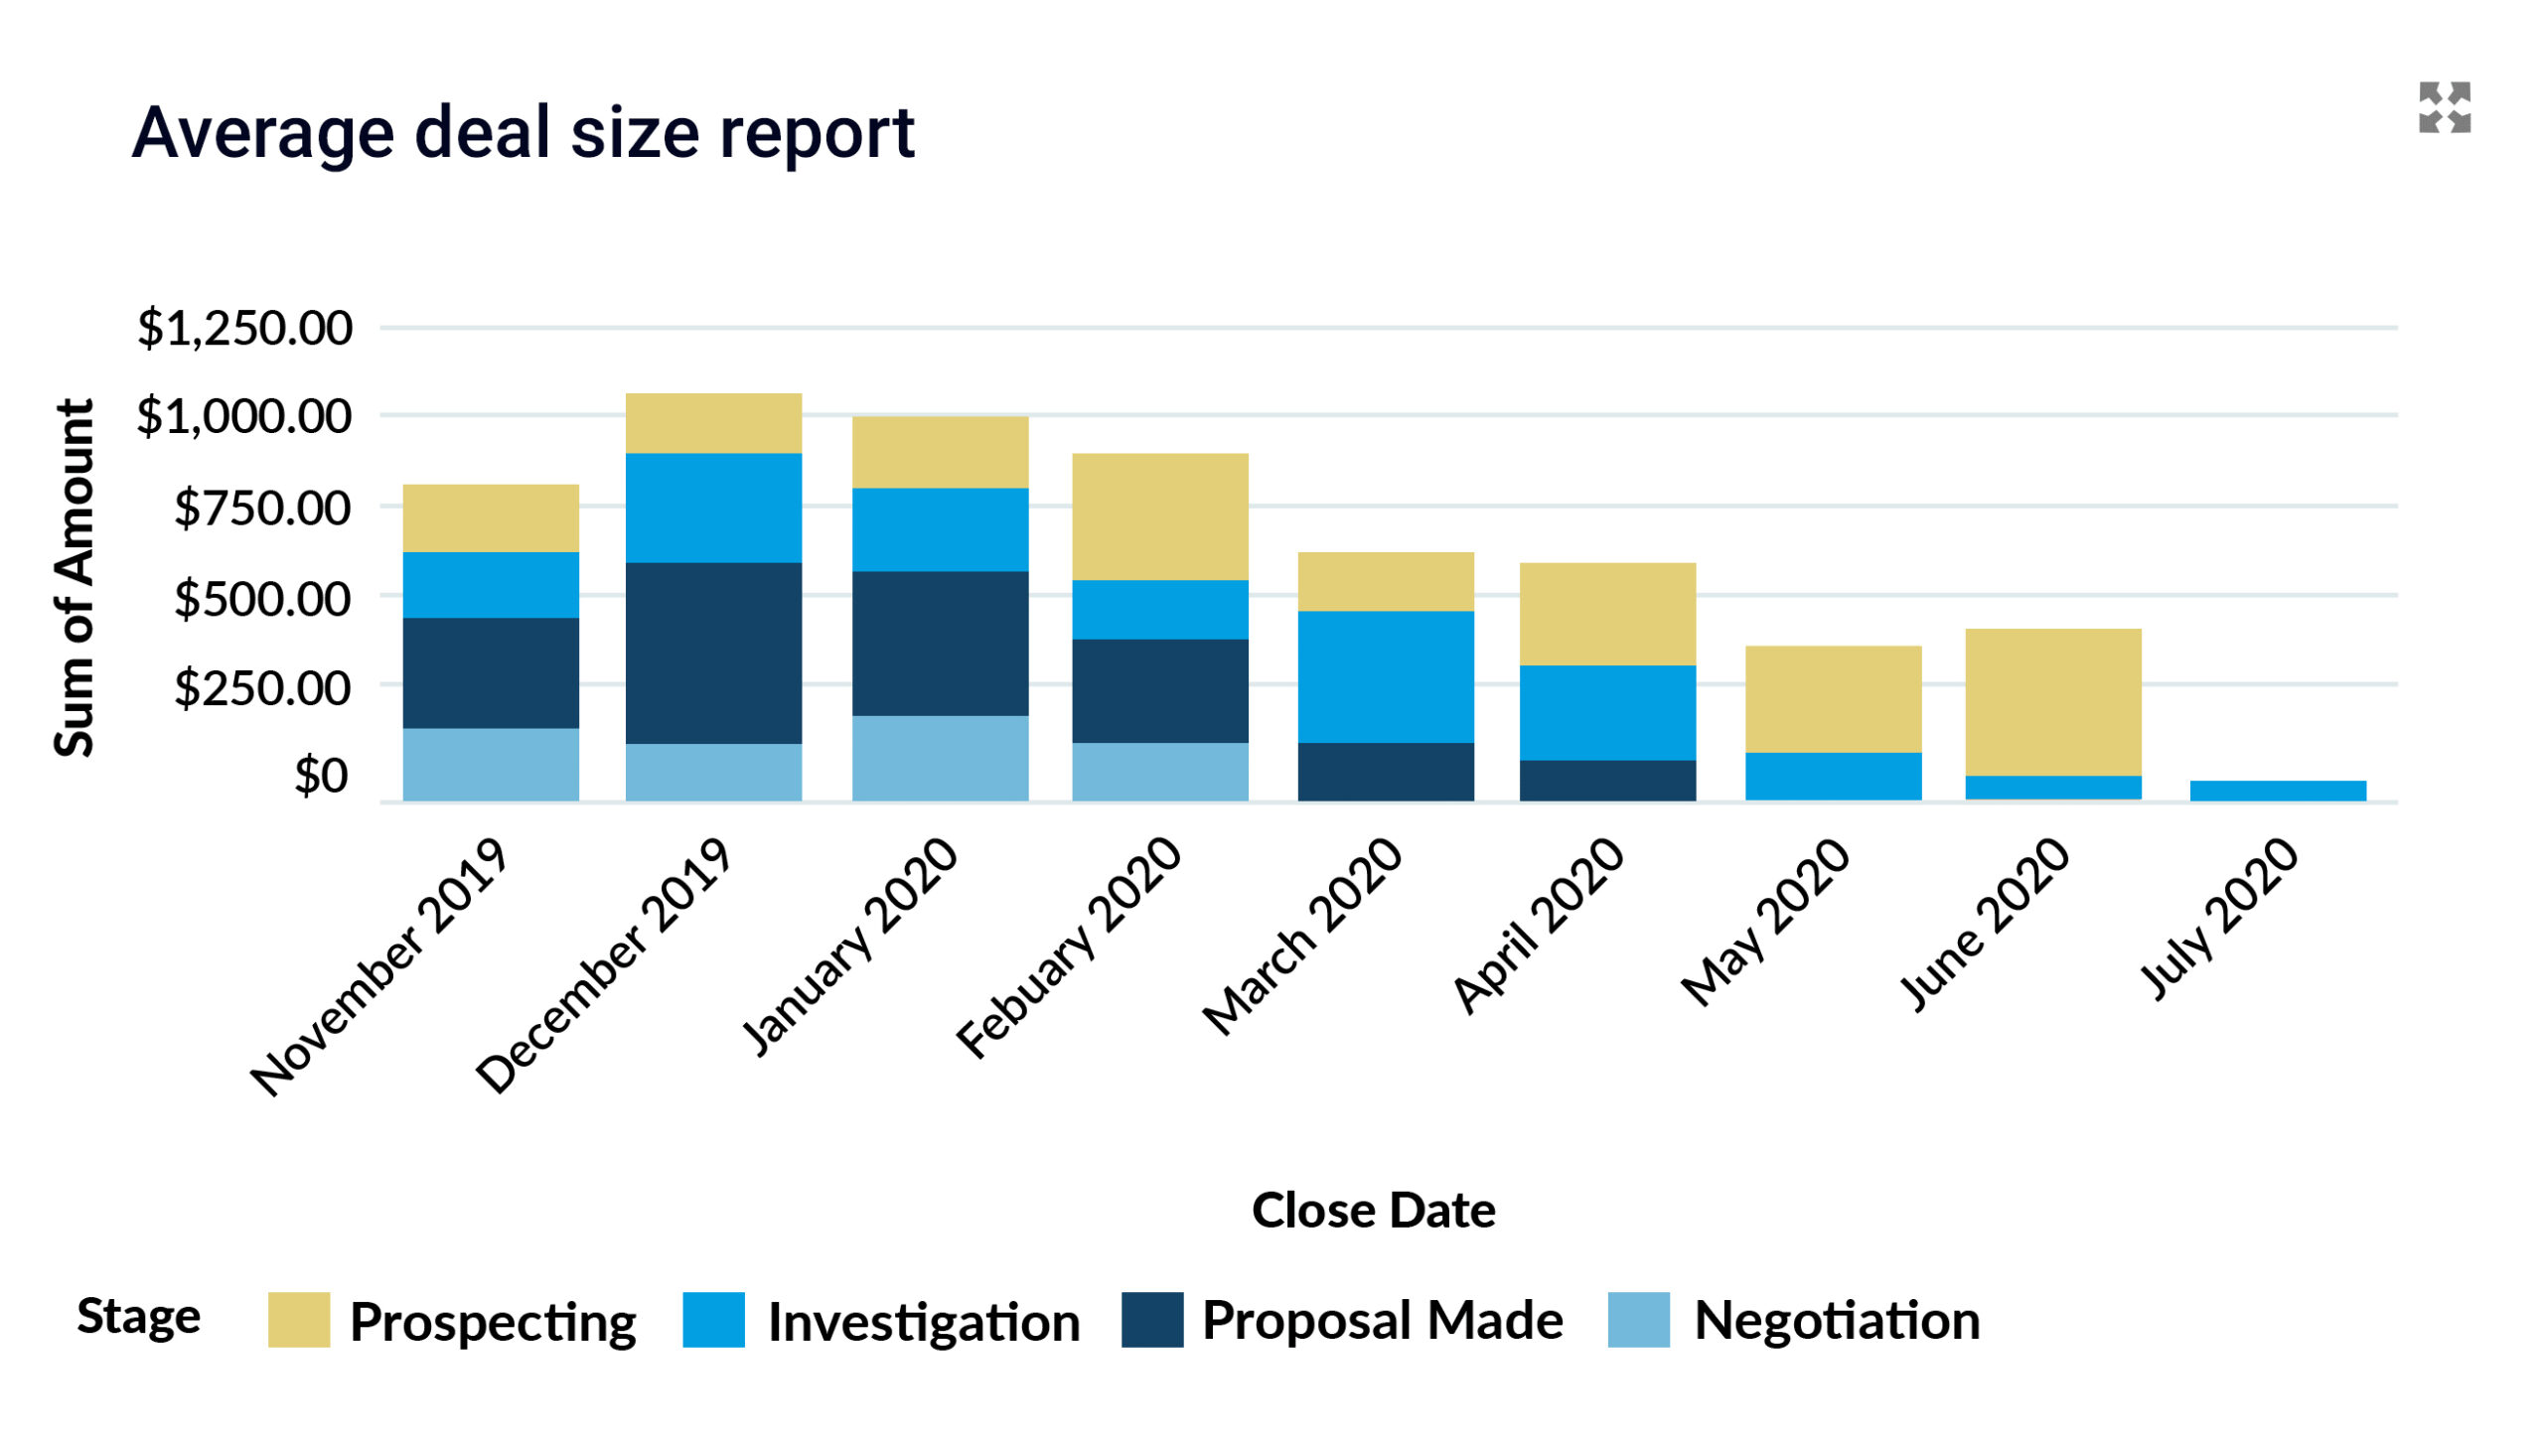
#8. Average deal size report
Key metric:
The report monitors average deal sizes for a recent time period across different industries, business units, and sources. These reports help to monitor which sources have smaller deal sizes.
Why it’s important:
This helps you identify which business units, industries, or products need to improve their cross-selling and pricing or package their offerings better.
It also helps to set expectations and milestones for sales quota to consider for your next sales cycle.
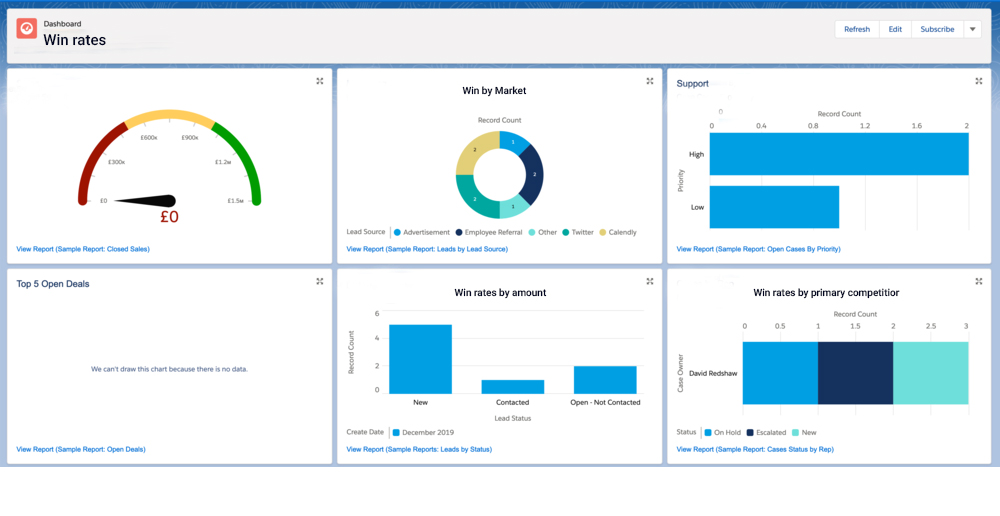
#9. Win rates
Key metric:
This report shows the number of won opportunities divided by the total number of opportunities.
Win rates can be calculated and compared for individual team members, teams, business units, target industries, products, and service offerings.
Why it’s important:
Sales representatives are highly competitive and always work on making their bonuses. Win rate data helps them to always stay one step ahead of their pipeline. If on average 50% of your opportunities convert, sales reps need to have at least twice those deals already lined up.
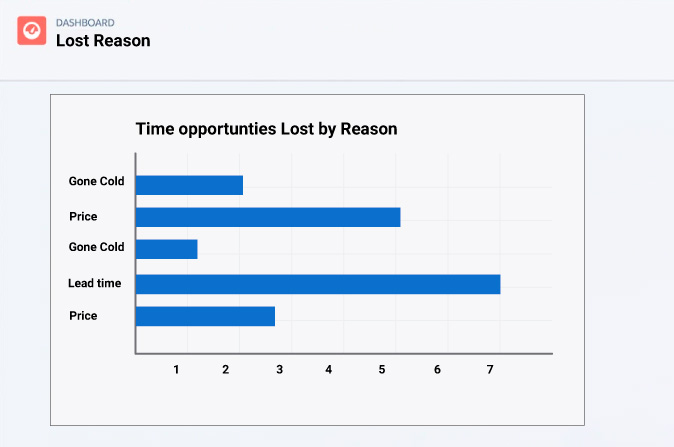
#10. Lost opportunities by reason
Key metric:
The report shows all lost opportunities along with the reason
Why it’s important:
To maximize sales, it is important to understand buyer motivation.
Tracking specific reasons for losing an opportunity give sales reps data-driven insights into buyer behavior. This information can be used to deliver services and products that could resonate with potential buyers.
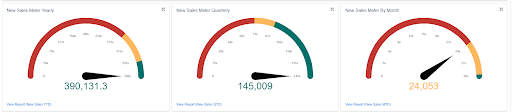
#11. Target Sales versus Actual Sales Report
Key metric:
This report tracks monthly sales against targeted sales each month to analyze which months tend to be off-target and which ones result in peak sales.
Why it’s important:
It tells business units which months need more sales opportunities and leads in the pipeline for consistent sales.
This report can be viewed together with Yearly, Quarterly, and Monthly sales meters
to evaluate sales success.
Wrapping Up
We’ve implemented several thousands of custom as well as standard reports and dashboards for sales teams depending on their strategies and unique needs.
From experience, we can say this has helped our customers make faster decisions and make improvements to their sales processes.
So, we’re also sharing a downloadable PDF of these essential sales productivity reports→ which your sales managers can use. Feel free to get in touch with our Salesforce experts in case you need assistance implementing these.
Have a Message For Us?
Please fillup the form and send your message.
Reduce Internal Email Clutter, Use Chatter to Simplify Life
Chances are, that as a Salesforce user, you aren’t using Chatter or aren’t aware of the power and value Chatter brings to team collaboration. Which means you’re missing out on productivity.
What Chatter is for
There can be times when you have a lot to handle that you even end up forgetting what you ate yesterday.
In such situations, it’s quite normal to lose track of previous communications with prospects. But that’s the kind of information you can’t afford to lose as it will make you look bad as a brand.
While capturing customer communications is essential, it’s equally important to capture internal communication as well. This is even more true when it comes to conversations about specific opportunities, accounts, or contacts.
Salesforce Chatter revolutionizes the way internal teams of a company interact with each other.
The idea is to make the management and collaboration over Salesforce records easier and keep teams on the same page instead of jumping back and forth on endless email threads that go nowhere. The best part is, Chatter can be implemented for all standard as well as custom objects.
We’ve implemented Chatter for many of our clients, and that alone has brought a lot of value to their business conversations. Chatter helps businesses to save money and time by increasing productivity and transparency. It brings all actions around a Salesforce record everything in one place and fixes the major communication gaps.
All changes can be captured, owned, and notified by triggering notification alerts.
We’ll now go over how Chatter streamlines internal communication and how you can use it effectively too.
How Chatter benefits teams
Chatter helps you maintain records and communications over them, so you can access them whenever you need them.
Organizations with a huge workforce can leverage Chatter to accelerate better coaction and enable easier communication. Apart from this, Chatter has various other uses like mentioned below.
1. Declutter Emails
Many of us prefer emails when it comes to approvals.
But that might not be the best option when you need a platform to discuss opinions.
We’d prefer something that helps to conduct free-flowing conversations. That’s where Chatter helps you to save from those long email chains, allowing you to communicate and share files easily.
Communication is the key for any business and Chatter makes it easy for you. You can maintain regular communication with teammates and even tag your managers for timely notifications, maintaining data security transparency with controlled visibility and keeping everybody in sync.
2. Share Files Smoothly
Whenever you have to share files and want the opinion of your team members or managers on them, you need to record the feedback for the document review.
Chatter helps to maintain that record for easier accountability.
This makes Chatter an incredible platform that connects all employees, enabling them to share data and files anywhere and anytime, while recording all feedback and comments.
3. Collaborate Privately on Sensitive Projects
Opportunities stored in Salesforce are usually sensitive. So permissions and access matter greatly for secure collaboration. With Chatter, teams can decide visibility and access to records and discussions.
Let’s now dive deeper into some of the Chatter features and how they can be used.
How to Use Chatter
1. Chatter Notifications for mobile and desktop
You can control Chatter Notifications in ‘Notification Delivery Settings’ in its Setup.
On enabling it, users will receive notifications on either the desktop, mobile (or both), depending on the kind of setup.
2. Chatter Groups for visibility and sharing
Chatter Groups allow users to collaborate on Salesforce in different groups.
Chatter allows you to create multiple types of groups like an enthusiast group or a core group. Whatever the type of group you need, you can define the visibility settings accordingly.
Public:
It allows anyone to find, join, and view the feed.
Private:
It allows anyone to find the group but they must ask to join.
You’ll only be able to see and add posts once you are a member.
Unlisted:
In this setting, the group created is not searchable and the members must be added through invite only.
Only the members of the group will be able to view and post.
3. Chatter Email Digest
When you decide to ‘Follow’ a colleague or join a Chatter Group, you will receive email notifications related to their Chatter activity.
You can control Chatter Group notifications.
Click ‘Manage Notifications’ and select the frequency of the notifications you would like to receive
4. Chatter Feed Tracking
This feature helps to display posts, polls, comments, and record updates.
For recording updates, you must enable feed tracking. Feed Tracking displays changes to record fields.
You can track a maximum of 20 fields per object.
Creating Chatter Posts
Chatter notifications can be sent by member to tag teams manually and automate alerts based on custom criteria for escalation. Needless to say, this is the essence of Chatter and it’s why you should understand the kinds of alerts you can set up and send.
Manual Chatter Posts
Chatter posts can be created manually by team members too.
This is mostly done when teams need to coordinate for approvals and reviews around projects and opportunities for tasks such as e-signing, legal reviews, finance budget approvals, and project approvals
This should help your teams across departments set up automated Chatter notifications to enable your teams to collaborate around opportunities on time.
You should be able to set up Chatter alerts based on criteria and conditions requiring escalation and transfer to different departments and seniority levels within the same department.
Examples on notification alerts on Chatter posts
Let’s now go over some typical use cases for Chatter notifications by businesses.
This should give us a sense for how your teams can use these to stay on top of opportunities and priorities by structuring alerts and conversations around them for a prompt response
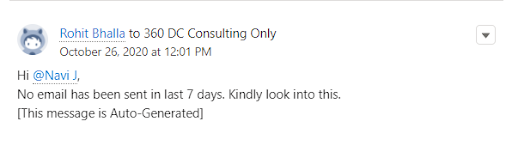
1. No email sent from the last 7 days on an open opportunity or account
If there is no email activity on an open opportunity or if no email updates have been sent out for a project in a week, then a Chatter alert from an admin can be sent to the Account Manager of the Account.
2. No activity on account from the last 20 days.
This sort of notification helps reconnect with customers if no kind of communications have gone out on an account for a considerable time.
Chatter alerts can be sent to the account manager of the account to follow up with the client in this case, as shown.
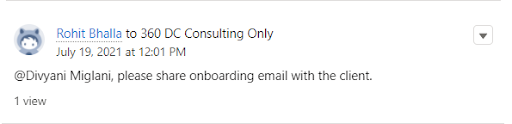
3. A reminder to share the Onboarding Email with the client.
As an Opportunity is closed-won by a Sales Rep, the chatter reminder will be sent from the admin to the Sales Rep of that opportunity to share the onboarding email with the client if it is not sent within 2 days.
This can also be used to pass on closed opportunities to the next steps in a relationship.
Posts can be used to tag and send reminders for action on closed-won opportunities to another department such as the project management department.
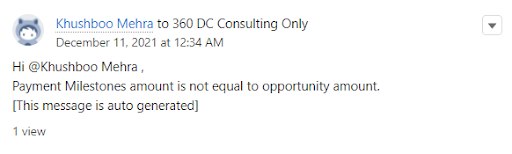
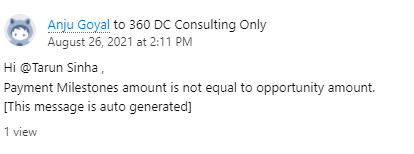
4. Payment Milestone amount is not equal to the Opportunity amount.
If a sales rep enters the wrong amount into the Payment Milestone, i.e., if there is a mismatch between invoice and opportunity for partial payments a Chatter post is sent to that sales rep for the same.
A similar message can go out to the account manager from the finance team as shown below.
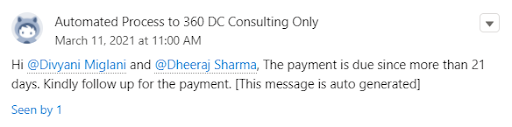
5. For Overdue Payments.
If the payment is not marked as paid even after 21 days of Payment Due Date a CHatter post tagging both the Finance Manager and Account Manager can be sent after every few days (after say 3 days, 1 week, 10 days, and 2 weeks)
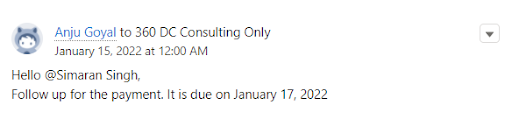
6. Follow-up reminder to Sales Reps regarding Due payments.
As the payment date is close and not received any payments yet, then there will be a chatter from finance to the respective Sales Rep to follow up with the client.
Here we are posting chatter, 2 days before the Payment Due Date.
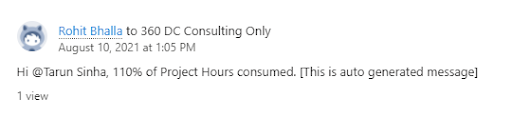
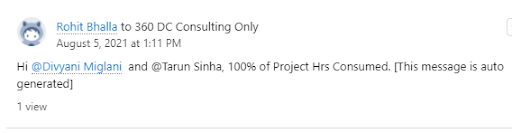
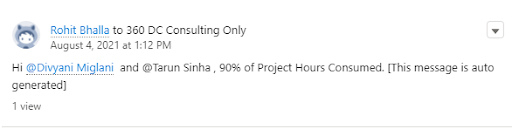
7. Hours consumed in a project
A Chatter post will start notifying consumed hours as it reaches 90% till 110%.
To highlight it to the delivery team that they need to focus on delivery of this project and make sure it is delivered on time.
Chatter helps to streamline processes and communication, thus increasing transparency by 100%, reducing dependency on information by 30-40%, and giving visibility to managers to track employee productivity and maintain previous communication.
Wrapping Up
You should now be familiar with numerous wonderful ways to use Chatter in your daily collaborations effectively.
Being a free social collaboration tool, it is an attractive platform that provides easy data access and smooth collaboration.
While you can use the PDF provided to set up Chatter notifications, you can always reach out to us for help in implementing these.